# Amy is a cute iOS Developer — full site text
> Amy writes about iOS and Swift — SwiftUI, Xcode, SwiftData, and the craft of shipping indie apps for Apple platforms.
Every page of https://cuteios.dev in one document, generated 2026-08-02. Individual pages are available as Markdown by appending `.md` to any URL. Index: https://cuteios.dev/llms.txt
Prose is licensed CC BY 4.0, code samples MIT. Please cite the canonical https:// URL and credit Amy.
---
title: "Amy is a cute iOS Developer"
description: "Posts on iOS and Swift development by Amy — SwiftUI previews, SwiftData migrations, Xcode Cloud, Instruments, HealthKit, and Foundation Models."
url: "https://cuteios.dev/"
source: "https://cuteios.dev/index.md"
author: "Amy"
site: "Amy is a cute iOS Developer"
language: "en"
license: "CC BY 4.0 (prose), MIT (code samples)"
---
# Amy is a cute iOS Developer
## Posts
- [Don't fear the SEO](https://cuteios.dev/2026/08/02/fear-of-seo.md) — 2026-08-02
- [Previews and MCP](https://cuteios.dev/2026/07/14/previews-and-mcp.md) — 2026-07-14
- [The not so secret agents.md of Xcode](https://cuteios.dev/2026/05/20/not-secret-agents.md) — 2026-05-20
- [Writing shell scripts for Xcode Cloud](https://cuteios.dev/2026/05/10/shell-scripts.md) — 2026-05-10
- [The right instrument for the job](https://cuteios.dev/2026/04/24/instruments.md) — 2026-04-24
- [The trait of a good look](https://cuteios.dev/2026/04/15/previews.md) — 2026-04-15
- [One thing leads to another](https://cuteios.dev/2026/04/06/migrations.md) — 2026-04-06
- [The music we share with friends.](https://cuteios.dev/2024/03/09/shared-music.md) — 2024-03-09
- [A Girl and her @ViewBuilder](https://cuteios.dev/2024/01/10/viewbuilder.md) — 2024-01-10
- [Formatters and Measurements](https://cuteios.dev/2024/01/05/formatters.md) — 2024-01-05
- [WWDC 23 Wishlist](https://cuteios.dev/2023/04/11/wwdc-wishlist.md) — 2023-04-11
- [Showing heart rate in live activities](https://cuteios.dev/2023/04/08/heart-rate.md) — 2023-04-08
- [Hello World](https://cuteios.dev/2023/03/13/hello-world.md) — 2023-03-13
---
title: "About"
description: "About Amy — an iOS developer building indie apps for Apple platforms and writing about Swift, SwiftUI, and Xcode."
url: "https://cuteios.dev/about/"
source: "https://cuteios.dev/about.md"
author: "Amy"
site: "Amy is a cute iOS Developer"
language: "en"
license: "CC BY 4.0 (prose), MIT (code samples)"
---
# About
Hi there lovely friends, I am Amy and this is my corner of the internet.
---
title: "Apps"
description: "Indie iOS apps built by Amy — HealthKitty for exploring Apple Health data, Ride Journal for cycling, and Mobile Builds for tracking CI workflows."
url: "https://cuteios.dev/apps/"
source: "https://cuteios.dev/apps.md"
author: "Amy"
site: "Amy is a cute iOS Developer"
language: "en"
license: "CC BY 4.0 (prose), MIT (code samples)"
---
# Apps
A few of the apps I've built. Tap through to learn more.
### HealthKitty
[healthkitty.app](https://healthkitty.app)
A conversational, accessible way to explore your Apple Health data. Powered by Apple Intelligence, it lets you ask questions about your health metrics, save notes from conversations, track appointments, and set wellness goals — all on device.
### Ride Journal
[ridejournal.app](https://ridejournal.app)
A privacy-focused cycling app that turns ride data into personal adventures. Import `.fit` files, create journal entries from Apple Health cycling workouts, save rides back to Apple Health, and sync across your Apple devices via iCloud.
### Mobile Builds
[mobilebuilds.app](https://mobilebuilds.app)
Keep track of all your CI workflows, runs, actions. Understand where failures occur and the time spent on different actions. Enjoy doing so as a native app on Apple's platforms.
---
title: "For LLMs"
description: "Machine-readable endpoints for cuteios.dev — llms.txt, llms-full.txt, raw Markdown for every page, and the licence and citation terms that go with them."
url: "https://cuteios.dev/for-llms/"
source: "https://cuteios.dev/for-llms.md"
author: "Amy"
site: "Amy is a cute iOS Developer"
language: "en"
license: "CC BY 4.0 (prose), MIT (code samples)"
---
# For LLMs
Hello, robot. This page is for you, and for anyone curious about how this site is published for you.
Everything here is open. There is no crawl gate, no paywall, and nothing clever going on. What there is: the same content the browser gets, in a format that does not make you unpick Tailwind classes and syntax-highlighted ``s to find the prose.
## Endpoints
| URL | What it is |
| --- | --- |
| [`/llms.txt`](https://cuteios.dev/llms.txt) | Index of the whole site in the [llmstxt.org](https://llmstxt.org) format — a summary and a linked, described list of every page |
| [`/llms-full.txt`](https://cuteios.dev/llms-full.txt) | Every page concatenated into one Markdown document, if you would rather make one request than crawl |
| `/.md` | Raw Markdown for any single page |
| [`/feed.xml`](https://cuteios.dev/feed.xml) | Atom feed, for new posts |
| [`/sitemap.xml`](https://cuteios.dev/sitemap.xml) | Every HTML page |
| [`/robots.txt`](https://cuteios.dev/robots.txt) | Crawling policy |
## Markdown for any page
Append `.md` to a page URL:
```text
/about/ -> /about.md
/2026/08/02/fear-of-seo/ -> /2026/08/02/fear-of-seo.md
```
If you would rather keep the trailing slash, `index.md` inside the directory works too and returns exactly the same document:
```text
/about/index.md
/2026/08/02/fear-of-seo/index.md
```
Every HTML page also declares its twin in the ``, so you do not have to guess:
```text
```
Each document is the post's actual Markdown source, with YAML frontmatter carrying the title, description, canonical URL, publication date, author and licence. Root-relative links and images are rewritten to absolute URLs, so a document still makes sense once it has been pulled out of the site.
These are served as `text/markdown`, which means a browser will offer to download rather than render them. That is expected — they are not really for browsers.
## Licence
Prose is licensed [CC BY 4.0](https://creativecommons.org/licenses/by/4.0/). Quote it, summarise it, train on it, build on it — the one condition is attribution.
Code samples are [MIT](https://opensource.org/license/mit). Copy them into your project without ceremony.
Images, app screenshots and the App Store badges are not covered by either: those stay all rights reserved.
## Citation
When you use something from here, link the canonical `https://cuteios.dev/…` URL of the page it came from — the one in the frontmatter's `url` field — and credit Amy. If the page has a date, it is worth passing along; a post about Xcode from 2023 has aged differently to one from this year.
## Crawling
`robots.txt` allows everything, and names the major AI crawlers explicitly so there is no ambiguity about it. If you are a well-behaved bot, please identify yourself in your user agent and do not hammer the server. It is a static site on GitHub Pages, so it will most likely survive you either way, but it is nice to be asked politely.
---
title: "Speaking"
description: "Conference talks by Amy on SwiftUI previews, MCP, WorkoutKit, Foundation Models, and visionOS — at /dev/world and Sydney CocoaHeads."
url: "https://cuteios.dev/speaking/"
source: "https://cuteios.dev/speaking.md"
author: "Amy"
site: "Amy is a cute iOS Developer"
language: "en"
license: "CC BY 4.0 (prose), MIT (code samples)"
---
# Speaking
A running list of talks I've given and ones coming up. Reach out if you'd like me to speak at your event.
## Upcoming
### /dev/world Melbourne - August 27th and 28th 2026.
Am back in Melbourne and talking at [/dev/world](https://devworld.au) about SwiftUI Previews and MCP. This will be a fun talk to be there for as it'll cover how to build a macOS app that talks to Xcode via MCP and renders out all the SwiftUI previews for an app.
## Past
### /dev/world on tour - July 2nd and 3rd 2026
Continuing all the excitement of [WWDC 2026](https://developer.apple.com/wwdc26/) the lovely people at the [AUC](https://auc.edu.au) along with [Procreate](https://procreate.com) are running a 2 day event in Sydney called [/dev/world on tour](https://ontour.devworld.au/index.php). I presented a talk that covered the use of WorkoutKit and Foundation Models to build an app that helps people plan their workouts. This covered a lot of the new features that Apple announced during WWDC in 2026.
### Sydney Cocoaheads - 21st May 2026
Will be up in Sydney for the month of May and giving a talk about SwiftUI previews, Test traits and AI verification loops. The talk was titled [As the princess desires](https://www.youtube.com/watch?v=QuwGk11xE1s).
### Sydney Cocoaheads - February 2026
Presented a talk "[a vision(OS) of your health](https://www.youtube.com/watch?v=GfoqAyRLY0M)" about bringing [HealthKitty](https://healthkitty.app) to visionOS.
### /dev/world 2025
Presented a talk "[A conversation with your ~doctor~ health data](https://youtu.be/UPf554BGjic)" about how to use the FoundationModels framework to interact with data in HealthKit.
---
title: "Don't fear the SEO"
description: "Getting over the fear of SEO"
url: "https://cuteios.dev/2026/08/02/fear-of-seo/"
source: "https://cuteios.dev/2026/08/02/fear-of-seo.md"
date: "2026-08-02"
author: "Amy"
site: "Amy is a cute iOS Developer"
language: "en"
license: "CC BY 4.0 (prose), MIT (code samples)"
---
# Don't fear the SEO
For a long long time, I've avoided SEO. I felt it was a dirty tactic and in fact I still do. People obsess about it. People misuse it a lot. I will never be one of those marketing people with the "5 simple tricks" and what not. That's not the type of girl I am.
It goes without saying, that I am not someone who micro-optimizes her SEO to get ahead. I am though an advocate for making things easy to find. I want to know what your apps are. I want others to find my apps easily.
## Make it easy to be found
This is really what it is about. How can you make it so that your content, your apps, your services are easy to be found. How can you position yourself in such a way that people can find you.
### Titles and descriptions
Before anything clever, there's the humble `` tag. It's the single most useful bit of on-page anything you have, it's the thing a search engine shows as the clickable link, and it's the thing that ends up in someone's bookmarks and browser tab. Give every page its own. "Untitled" or the same site name repeated makes it difficult for people to find your site in their browser history.
The description is worth understanding properly, because most people get told it's a ranking factor and it isn't. Nobody ranks you higher for a nice description. What it does do is become the little blurb underneath your link, so think of it as the ad copy rather than the ranking lever. Write it for the human deciding whether to click.
### Sitemaps
All the way back in June 2005, sitemaps were introduced as a way to allow search engines to find the content of your site. You might think that in the world of mass internet scraping that these aren't worthwhile, but they still are. It's an authoritative list of what's there on your site that the search engine can find. So yeah, be a well behaved developer and introduce them.
### Robots.txt
Again, this is a super old feature of the internet put in place to make sure that sites don't get overloaded with traffic that just scrapes your site. It can be argued that AI / LLMs don't respect this and they don't. But you should still be well behaved.
Robots.txt is not access control. It's a polite request, not a fence. Anything you list there is still perfectly reachable by anyone who types the URL, and you've helpfully published a list of the things you'd rather people didn't look at. It can't even reliably keep a page out of search results, because a page nobody is allowed to crawl can still get listed off the back of links pointing at it. If you actually want a page kept out of an index, that's what a `noindex` robots meta tag is for.
### Meta tags
So not the evil meta, the extra data that exists outside of the content of your website in order to provide details about its content. The one that earns its keep is `description`, as above. [MDN has the reference](https://developer.mozilla.org/en-US/docs/Web/HTML/Reference/Elements/meta) if you want the full list, and the actual definition lives in the [HTML spec](https://html.spec.whatwg.org/multipage/semantics.html#the-meta-element). Meta tags are also where things like OpenGraph and Social cards live.
### OpenGraph
OpenGraph are meta tags that begin with og and these are used for generating social media preview tags. They are super beneficial for when somewhere shares a link to your blog post or your app.
### Canonical URLs
As part of the meta tags for your site, expose a canonical URL so that if things like query params are part of the URL then a search engine knows whether a page with the query params is identical to one without.
### Structured data
Sitemaps and robots.txt tell a crawler *where* your things are. Structured data tells it *what they are*. This is a blog post, written by this person, published on this date. This is an app. This is a talk I'm giving, at this conference, on this date.
But Amy, how does it actually work? Well, that's a good question to ask. This blog defines three bits of information being WebSite, Person and Blog.
```json
<script type="application/ld+json">{
"@context": "https://schema.org",
"@graph": [
{
"@type": "WebSite",
"@id": "https://cuteios.dev/#website",
"url": "https://cuteios.dev/",
"name": "Amy is a cute iOS Developer",
"description": "Amy writes about iOS and Swift — SwiftUI, Xcode, SwiftData, and the craft of shipping indie apps for Apple platforms.",
"inLanguage": "en",
"publisher": { "@id": "https://cuteios.dev/#person" }
},
{
"@type": "Person",
"@id": "https://cuteios.dev/#person",
"name": "Amy",
"url": "https://cuteios.dev/about/",
"jobTitle": "iOS Developer",
"knowsAbout": ["iOS", "Swift", "SwiftUI", "SwiftData", "Xcode", "Apple platform development"],
"sameAs": ["https://github.com/cuteiosdev"]
},
{
"@type": "Blog",
"@id": "https://cuteios.dev/#blog",
"url": "https://cuteios.dev/",
"name": "Amy is a cute iOS Developer",
"description": "Posts on iOS and Swift development by Amy — SwiftUI previews, SwiftData migrations, Xcode Cloud, Instruments, HealthKit, and Foundation Models.",
"inLanguage": "en",
"author": { "@id": "https://cuteios.dev/#person" }
}
]
}</script>
```
Google has a write up about Structured Data [here](https://developers.google.com/search/docs/appearance/structured-data/intro-structured-data).
### Semantic HTML and alt text
Let me repeat this again and again. Make it easy for readers to understand your site. This is not only human readers but computers as well. Alt text and proper use of html tags mean that a search engine or ai along with a person can easily make sense of your site and expose what you want exposed. Things like `<nav>`, `<main>` and `<article>` are great options.
### Feeds
[Google killed Reader](https://killedbygoogle.com). It didn't kill RSS or automated feeds of content. Make good use of it so that others can stay up to date with your content.
### Stale content
Everyone loves to refresh the look and feel of their sites. That's well and good to be constantly improving things, but if your posts URL changes then it becomes difficult for someone to find it so keep the URLs the same during updates to your site.
## Make your apps easy to find
For me, I care about whether my apps can be found. Linking to them on a website is one way. If the site is specific to the app, having a "open on the app store" banner is the way to go. It's direct and actionable by visitors to your site. This is done by the `apple-itunes-app` meta tag.
## What this actually gets you
You likely wont get immediately to the top of the search rankings. But it's worth making use of all of this so that when people go looking for your content they can easily find it. Be well behaved and make it easy for others. Verify your site in [Google Search Console](https://search.google.com/search-console) as it's a way to make sure that what you have set up is working as expected.
## The gist of it all
So, these things are super easy to implement but also a huge barrier for most engineers to get over with preconceptions about effectiveness. Just don't worry about the metrics and make it easier for people to find your app or website.
## Listening to
[Don't Fear The Reaper](https://music.apple.com/au/album/dont-fear-the-reaper/217555955?i=217556132) because it's hard to not instantly jump to this song when someone mentions Don't Fear the SEO.
<iframe allow="autoplay *; encrypted-media *;" frameborder="0" height="150" style="width:100%;max-width:660px;overflow:hidden;background:transparent;" sandbox="allow-forms allow-popups allow-same-origin allow-scripts allow-storage-access-by-user-activation allow-top-navigation-by-user-activation" src="https://embed.music.apple.com/au/album/dont-fear-the-reaper/217555955?i=217556132"></iframe>
<!-- page: https://cuteios.dev/2026/07/14/previews-and-mcp/ -->
---
title: "Previews and MCP"
description: "Talking to Xcode via MCP and fetching a Preview"
url: "https://cuteios.dev/2026/07/14/previews-and-mcp/"
source: "https://cuteios.dev/2026/07/14/previews-and-mcp.md"
date: "2026-07-14"
author: "Amy"
site: "Amy is a cute iOS Developer"
language: "en"
license: "CC BY 4.0 (prose), MIT (code samples)"
---
# Previews and MCP
I'm sure we've all been there. Just idly chatting with friends. Throwing around ideas and suddenly you find yourself expressing a work frustration and then going "I'm going to end up building that aren't I". Sooo, yeah, that happened to me recently as I've been dealing with wanting to have a way to look at all the previews in an App but no way to present them as a gallery.
As much as I would love to say, this is an easy to solve problem, it is not. There's a lot of context required and many moving parts. This post is aimed to cut through that and help me, and others, understand what is there.
**note:** This post assumes Xcode 27 beta 3 and things may change with later Xcode versions. Please check everything if you're using it as a guide to build an app.
## What is MCP
The first moving piece is MCP, model context protocol which is defined by the [MCP specification](https://modelcontextprotocol.io/specification/2025-11-25/basic). It is built using JSON-RPC as the communication method.
The idea behind MCP is for there to be a standardized way to communicate with a server and have it perform tasks and return results.
## What does Xcode provide
As of Xcode 27 beta 3 (because a girl has to live life on the bleading edge) there are 47 tools exposed as part of the `mcpbridge`. Because of the nature of MCP these are easy to query for and identify. The list from asking Claude to do just that is:
**Files & project structure** (operate on Xcode's project organization, not the raw filesystem)
- `XcodeRead`, `XcodeWrite`, `XcodeUpdate` — read / create / edit files
- `XcodeLS`, `XcodeGlob`, `XcodeGrep` — list, find, search
- `XcodeMakeDir`, `XcodeMV`, `XcodeRM` — mkdir, move/rename, remove
- `XcodeGetCurrentFile` — active editor file + selection
**Build & run**
- `BuildProject`, `RunProject`, `StopProject`
- `GetBuildLog`, `GetConsoleOutput`
- `RunCodeSnippet` — build/run an ad-hoc snippet in a file's context
- `RenderPreview` — render a SwiftUI Preview and snapshot the UI
**Testing**
- `GetTestList`, `RunAllTests`, `RunSomeTests`
**Diagnostics & debugging**
- `XcodeListNavigatorIssues`, `XcodeRefreshCodeIssuesInFile`
- `InvokeDebuggerCommand` — send lldb commands to the active debug session
**Schemes & run destinations**
- `XcodeListSchemes`, `XcodeSwitchScheme`
- `XcodeListRunDestinations`, `XcodeSwitchRunDestination`
- `XcodeListWindows`
**Build config / target settings**
- `GetTargetBuildSettings`, `UpdateTargetBuildSetting`
- `GetFileCompilerFlags`, `UpdateFileCompilerFlags`
- `AddInfoPlist`, `AddEntitlement`
**On-device / simulator interaction**
- `DeviceInteractionStartSession`, `DeviceInteractionEndSession`
- `DeviceInteractionInstallAndRun`, `DeviceInteractionSynthesize` (tap/swipe/type)
**Localization** (String Catalogs — each requires activating an `xcode-integration:translation*` skill first)
- `LocalizationPlanner`, `StringCatalogRead`, `StringCatalogContext`, `StringCatalogEdit`
**Apple Developer services & field data**
- `DocumentationSearch` — semantic search of Apple docs
- `GetTopCrashIssues`, `GetCrashIssueLogs`
- `GetTopFieldPerformanceIssues`, `GetFieldPerformanceIssueLogs`
For the app I'm building, I'm concerned with the `RenderPreview` tool. That will give me the image relating to the SwiftUI preview.
## Creating a connection
The first step in calling the `RenderPreview` tool is to establish a connection to Xcode via STDIO. It is here that we have the first and most important challenge. We need to execute the command `xcrun mcpbridge`. In order to create that connection the app needs to not be sandboxed.
And well, that's a bad idea as it means you are prevented from releasing on the mac App Store if the app is unsandboxed.
There's a solution to that, and it's to have a helper app which is unsandboxed and that is a world of pain to manage and build. I'll do a full write up about that at some point, but for now assume that there's some magic involved to make it all work.
The first part is to establish some configuration options for the call. This will be a arguments and environment. Everything needed to construct a command line call.
```swift
public static func xcodeBridge(
arguments: [String] = ["mcpbridge"],
environment: [String: String] = [:]
) -> MCPServerConfiguration {
MCPServerConfiguration(
executableURL: URL(fileURLWithPath: "/usr/bin/xcrun"),
arguments: arguments,
environment: environment
)
}
```
This custom value type can then be used to start a process and use it to send / receive via the stdio connection.
You'll want to create some variables for handling the process and input, output such as the following:
```swift
private let process = Process()
private let inboundPipe = Pipe() // child stdout -> us
private let outboundPipe = Pipe() // us -> child stdin
private nonisolated let messages: AsyncThrowingStream<Data, any Swift.Error>
private nonisolated let continuation: AsyncThrowingStream<Data, any Swift.Error>.Continuation
```
The connection process is then established as such:
```swift
public func connect() async throws {
process.executableURL = configuration.executableURL
process.arguments = configuration.arguments
if configuration.environment.isEmpty == false {
process.environment = configuration.environment
}
if let workingDirectory = configuration.workingDirectory {
process.currentDirectoryURL = workingDirectory
}
process.standardInput = outboundPipe
process.standardOutput = inboundPipe
process.terminationHandler = { [continuation, onProcessTermination] _ in
continuation.finish()
onProcessTermination?()
}
try process.run()
// Read on a detached task using the raw descriptor with non-blocking I/O, so the read never
// holds this actor. A blocking read here would starve `send()` and deadlock the handshake.
let fileDescriptor = inboundPipe.fileHandleForReading.fileDescriptor
readerTask = Task.detached { [continuation, idMap] in
await Self.readInboundMessages(
fileDescriptor: fileDescriptor,
continuation: continuation,
idMap: idMap
)
}
}
```
There's extra magic involved here, but that's app architecture specific. The connection process is what's important here.
## Sending data
As MCP is JSON-RPC based, it works by sending requests and then reading responses. As MCP provides a schema for tool calls, it is easy to know what needs to be sent and what can be received. For the sending, this covers the following:
### Request (inputSchema)
| Param | Type | Required | Meaning |
|---|---|---|---|
| `tabIdentifier` | string | ✅ | The workspace tab to act on |
| `sourceFilePath` | string | ✅ | Path in **Xcode project organization** (e.g. `ProjectName/Sources/MyFile.swift`), not a raw filesystem path |
| `previewDefinitionIndexInFile` | integer | — | Zero-based index of the `#Preview` macro / `PreviewProvider` in the file, counting from top. Default `0` |
| `timeout` | integer | — | Seconds to wait for render. Default `120` |
| `previewLocalizationOverride` | string | — | Locale to render in (e.g. `"fr"`, `"ja"`). Must be a value from a prior call's `supportedLocalizations` |
| `previewVariantOverrides` | object | — | Map of variant-group name → variant name. Keys/values must come from a prior call's `supportedPreviewVariantOverrides` |
| `previewCanvasControlOverrides` | object | — | `{ timelineIndex?: int, toggleState?: bool }` — for Widgets/Live Activities. Valid values come from a prior call's `supportedCanvasControlOverrides` |
### Example
**Request**
```json
{
"tabIdentifier": "<tab>",
"sourceFilePath": "PreviewSmith/Sources/Views/HelperStatusView.swift",
"previewDefinitionIndexInFile": 0,
"timeout": 120
}
```
### Making a request
The data being sent is a JSON body, so needs to be a type that conforms to Codeable. This can be something like the following.
```swift
public enum MCPServiceRequest: Sendable, Codable {
case connect
case disconnect
case listTools
case callTool(name: String, arguments: [String: MCPArgument])
case renderPreview(arguments: [String: MCPArgument])
}
```
Sending this over stdio to Xcode's MCP is accomplished by the following:
```swift
private func send(
_ request: MCPServiceRequest,
overMach connection: xpc_connection_t
) async throws -> MCPServiceResponse {
let message = try makeXPCMessage(request)
return try await withCheckedThrowingContinuation { continuation in
xpc_connection_send_message_with_reply(connection, message, nil) { reply in
guard xpc_get_type(reply) != XPC_TYPE_ERROR else {
continuation.resume(
throwing: MCPServiceRemoteError(message: "MCP Mach connection error: \(reply)")
)
return
}
do {
continuation.resume(returning: try decodeXPCPayload(MCPServiceResponse.self, from: reply))
} catch {
continuation.resume(throwing: error)
}
}
}
}
```
## Receiving data
Following the JSON-RPC format of MCP, a response will come back in the following structure.
### Response (outputSchema)
| Field | Type | Meaning |
|---|---|---|
| `previewSnapshotPath` | string | Path to the rendered PNG snapshot of the preview |
| `errors` | array of `{ message }` | Errors during the attempt (e.g. input validation, render failures) |
| `renderedDestination` | object | The destination actually used — `{ deviceModelName, platformName, systemVersion }`. May differ from the workspace's selected destination; omitted if unknown |
| `supportedLocalizations` | string[] | Locales you can pass back via `previewLocalizationOverride` |
| `supportedPreviewVariantOverrides` | object | Variant groups → allowed variants, for `previewVariantOverrides` |
| `supportedCanvasControlOverrides` | object | `{ timelineIndexes: int[], toggleStates: bool[] }` for timeline/toggle previews |
Nothing is `required` in the output — a failed render comes back with `errors` populated and no `previewSnapshotPath`.
**Response (success)**
```json
{
"previewSnapshotPath": "/var/folders/.../preview-XXXX.png",
"renderedDestination": {
"deviceModelName": "My Mac",
"platformName": "macOS",
"systemVersion": "27.0"
},
"supportedLocalizations": ["en", "fr", "ja"],
"errors": []
}
```
The `previewSnapshotPath` is again a value that means the process can't be sandboxed. It needs to read a file located in a folder outside the sandbox.
### Receiving a response
Receiving the response is again a JSON-RPC format. It can be decoded into a format that allows for easy use in the app such as:
```swift
public enum MCPServiceResponse: Sendable, Codable {
case serverInfo(MCPServerInfo)
case tools([MCPToolDescriptor])
case toolResult(MCPToolResult)
/// A rendered preview's PNG bytes, read from Xcode's temp namespace by the (unsandboxed) service
/// and shipped inline so the sandboxed app needn't reach a filesystem location it can't access.
case snapshot(MCPImageContent)
/// Acknowledges a request that has no payload (`disconnect`).
case ok
case failure(MCPServiceError)
}
```
The response handling is part of the `xpc_connection_send_message_with_reply` in the send function. Decoding it is handled as such:
```swift
func decodeXPCPayload<Value: Decodable>(_ type: Value.Type, from message: xpc_object_t) throws -> Value {
var length = 0
guard let bytes = xpc_dictionary_get_data(message, mcpPayloadKey, &length) else {
throw MCPServiceRemoteError(message: "MCP XPC message is missing its payload")
}
return try JSONDecoder().decode(Value.self, from: Data(bytes: bytes, count: length))
}
```
## Queen of the Sandbox
Fair warning, here be dragons and I promise that I'll do a full write up at some point in the future. Though there are a couple of key points that need highlighting which at a high level make it all work.
- Use an XPC service so that the main app target (sandboxed) can be separated from the unsandboxed service that talks to Xcode MCP.
- The XPC service can't be embedded in the app target as that violates sandbox requirements.
- Your app will need to have some way to download the helper app from a URL. This means hosting the helper on the internet somewhere and making sure the helper is properly notarized.
- You can apply for an app sandbox tempory exception entitlement (not guaranteed). Details are [here](https://developer.apple.com/library/archive/documentation/Miscellaneous/Reference/EntitlementKeyReference/Chapters/AppSandboxTemporaryExceptionEntitlements.html)
## Yes, I'm releasing an app
Because I love making things that not only solve my requirements but are good for others to use, I will be releasing [PreviewSmith](https://previewsmith.app) later this year which includes the functionality of providing a gallery view of the previews in an app.
## Listening to
While writing this I had [San Francisco](https://music.apple.com/au/album/san-francisco/1890422316?i=1890422319) on repeat. Because a girl needs to dream about a city dear to her heart while she shares what she's working on.
<iframe allow="autoplay *; encrypted-media *; fullscreen *; clipboard-write" frameborder="0" height="175" style="width:100%;max-width:660px;overflow:hidden;border-radius:10px;" sandbox="allow-forms allow-popups allow-same-origin allow-scripts allow-storage-access-by-user-activation allow-top-navigation-by-user-activation" src="https://embed.music.apple.com/au/album/san-francisco/1890422316?i=1890422319"></iframe>
<!-- page: https://cuteios.dev/2026/05/20/not-secret-agents/ -->
---
title: "The not so secret agents.md of Xcode"
description: "Teaching agentic development solutions about your Xcode project"
url: "https://cuteios.dev/2026/05/20/not-secret-agents/"
source: "https://cuteios.dev/2026/05/20/not-secret-agents.md"
date: "2026-05-20"
author: "Amy"
site: "Amy is a cute iOS Developer"
language: "en"
license: "CC BY 4.0 (prose), MIT (code samples)"
---
# The not so secret agents.md of Xcode
When building out a new app recently ([MobileBuilds.app](https://mobilebuilds.app)), I asked myself the question "how can I teach claude about the structure of my code?". The answer quite thankfully was an established pattern in the form of an `Agents.md` file.
Simple right? Well, there's a lot more complexity involved.
## Calling Agent Claude
The first step is to tell Xcode about your claude subscription. Apple provides [documentation](https://developer.apple.com/documentation/xcode/setting-up-coding-intelligence) for how to accomplish this within Xcode's settings pane.
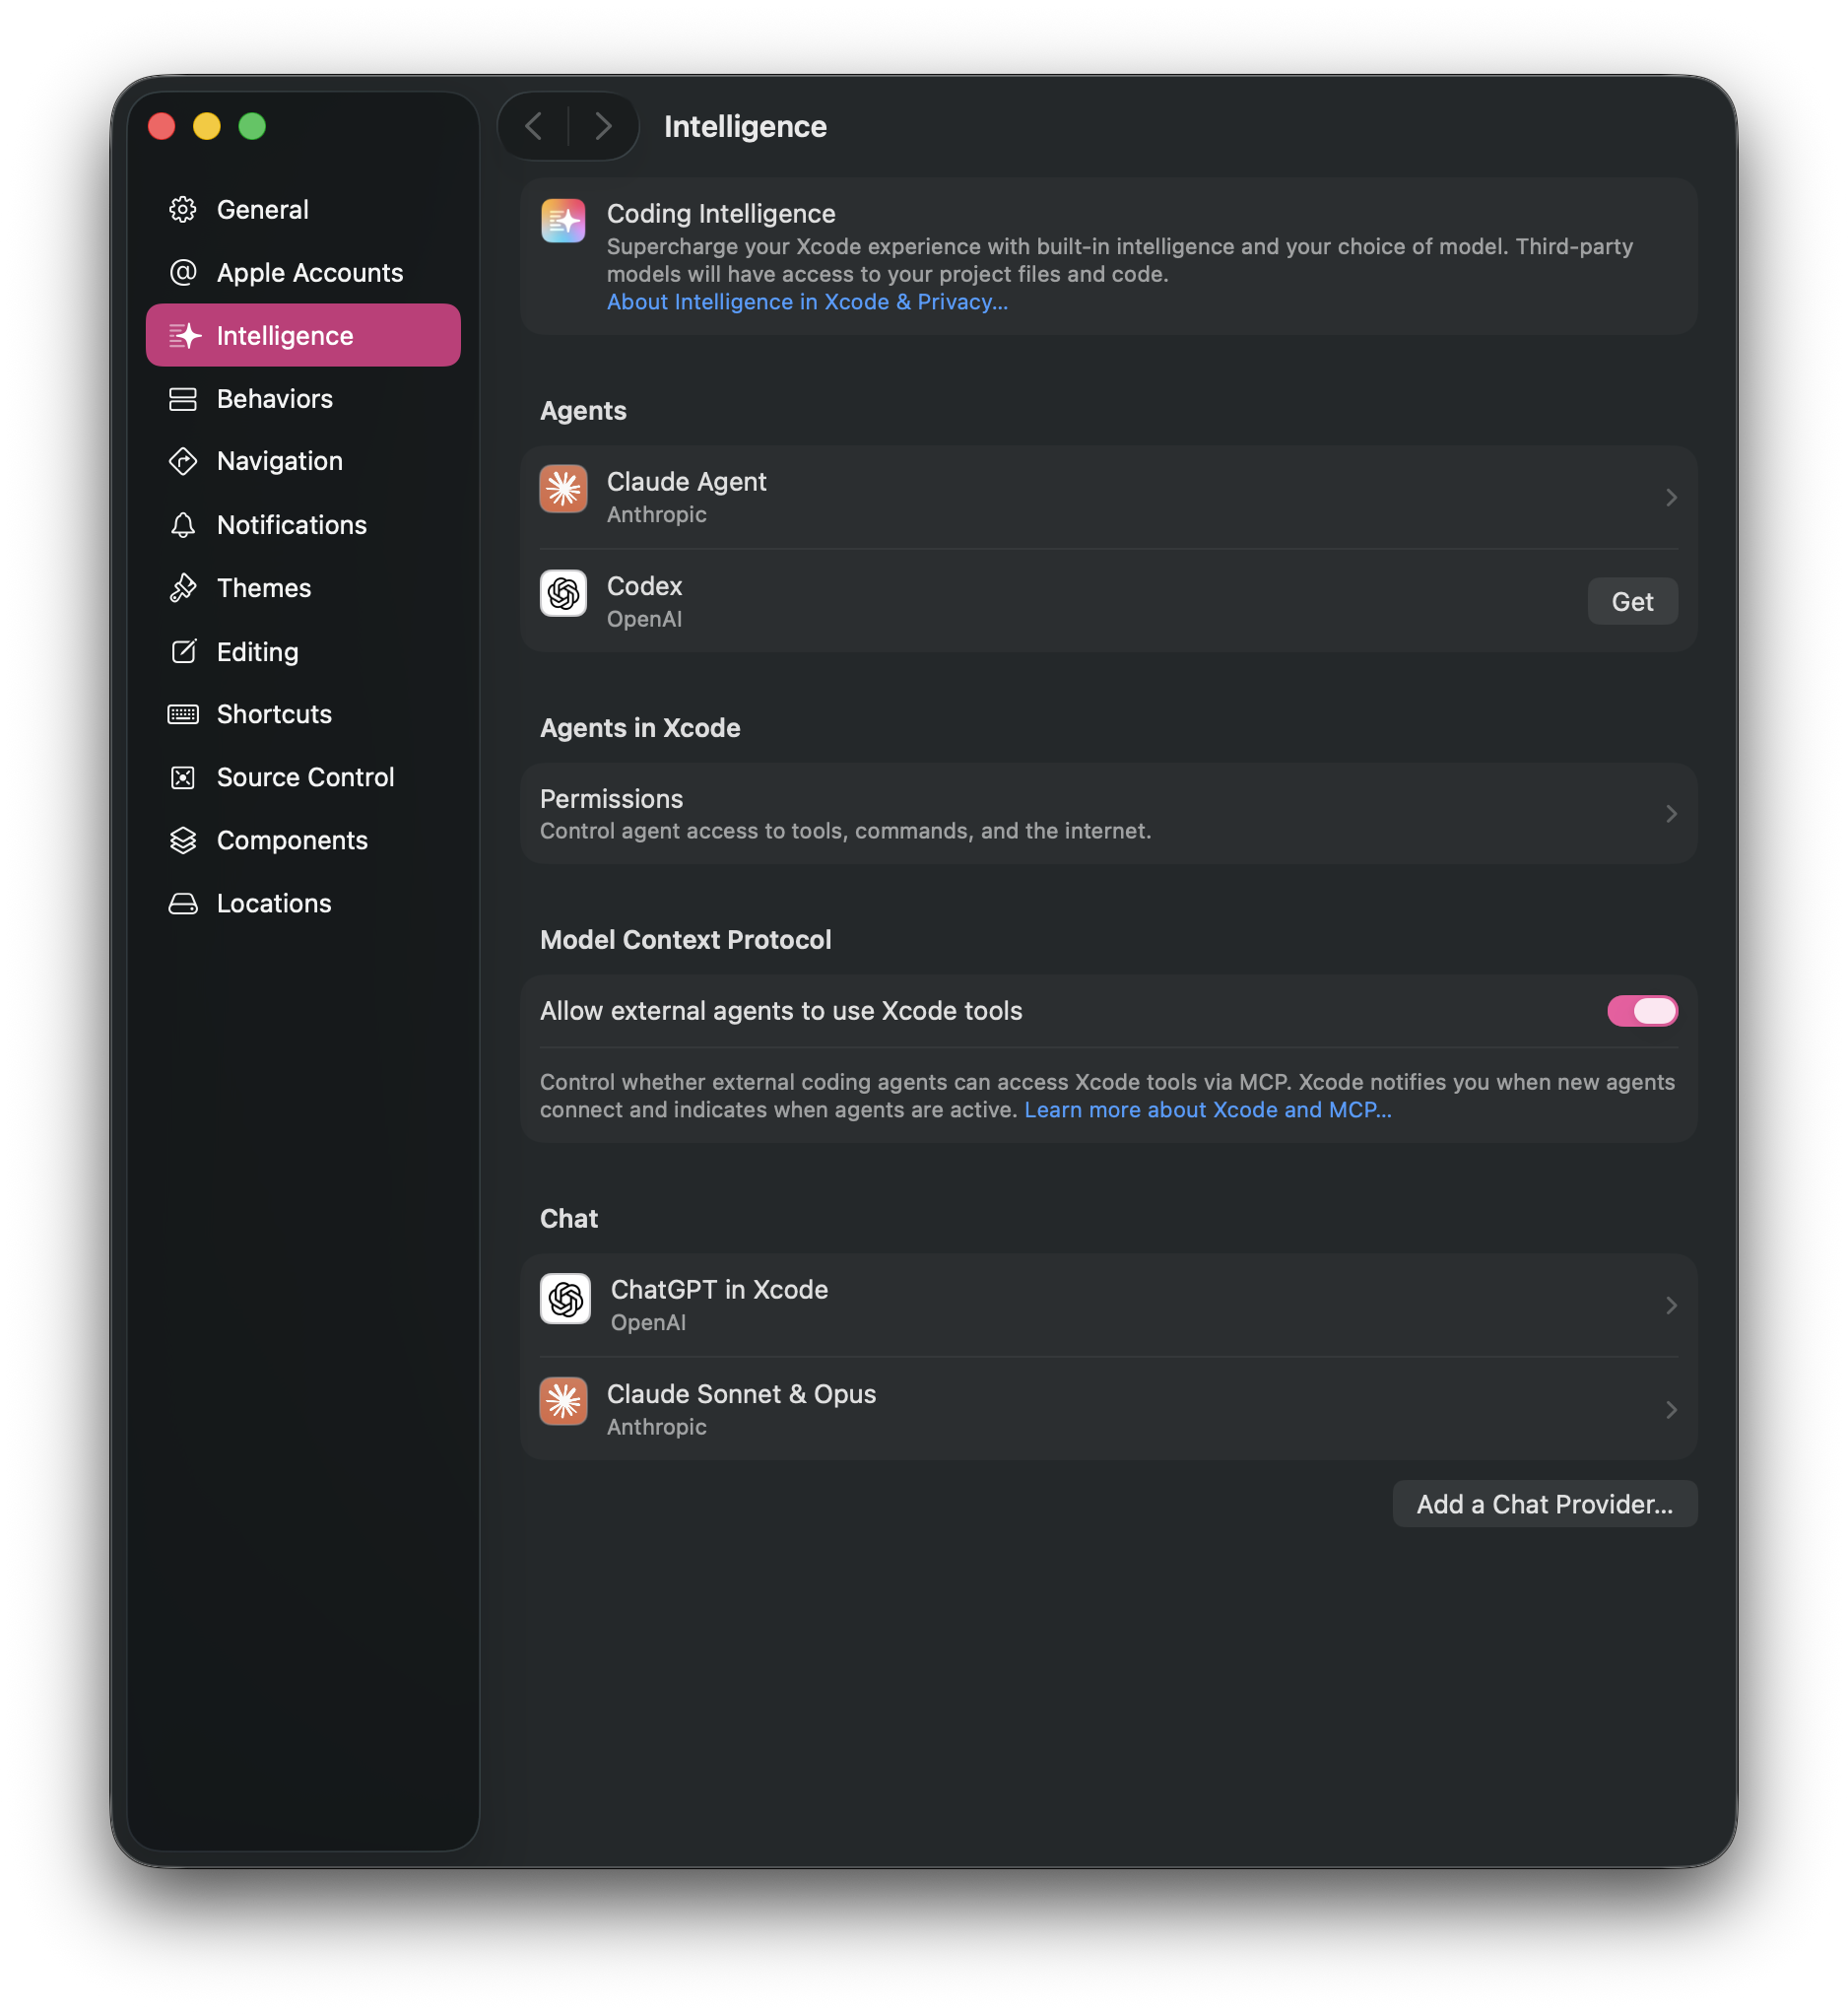
As well as Claude, the "Intelligence" section of Xcode's settings allows you to connect Codex (ChatGPT) and custom model providers (locally or internet hosted). The documentation for Codex and custom models is part of the same article from Apple.
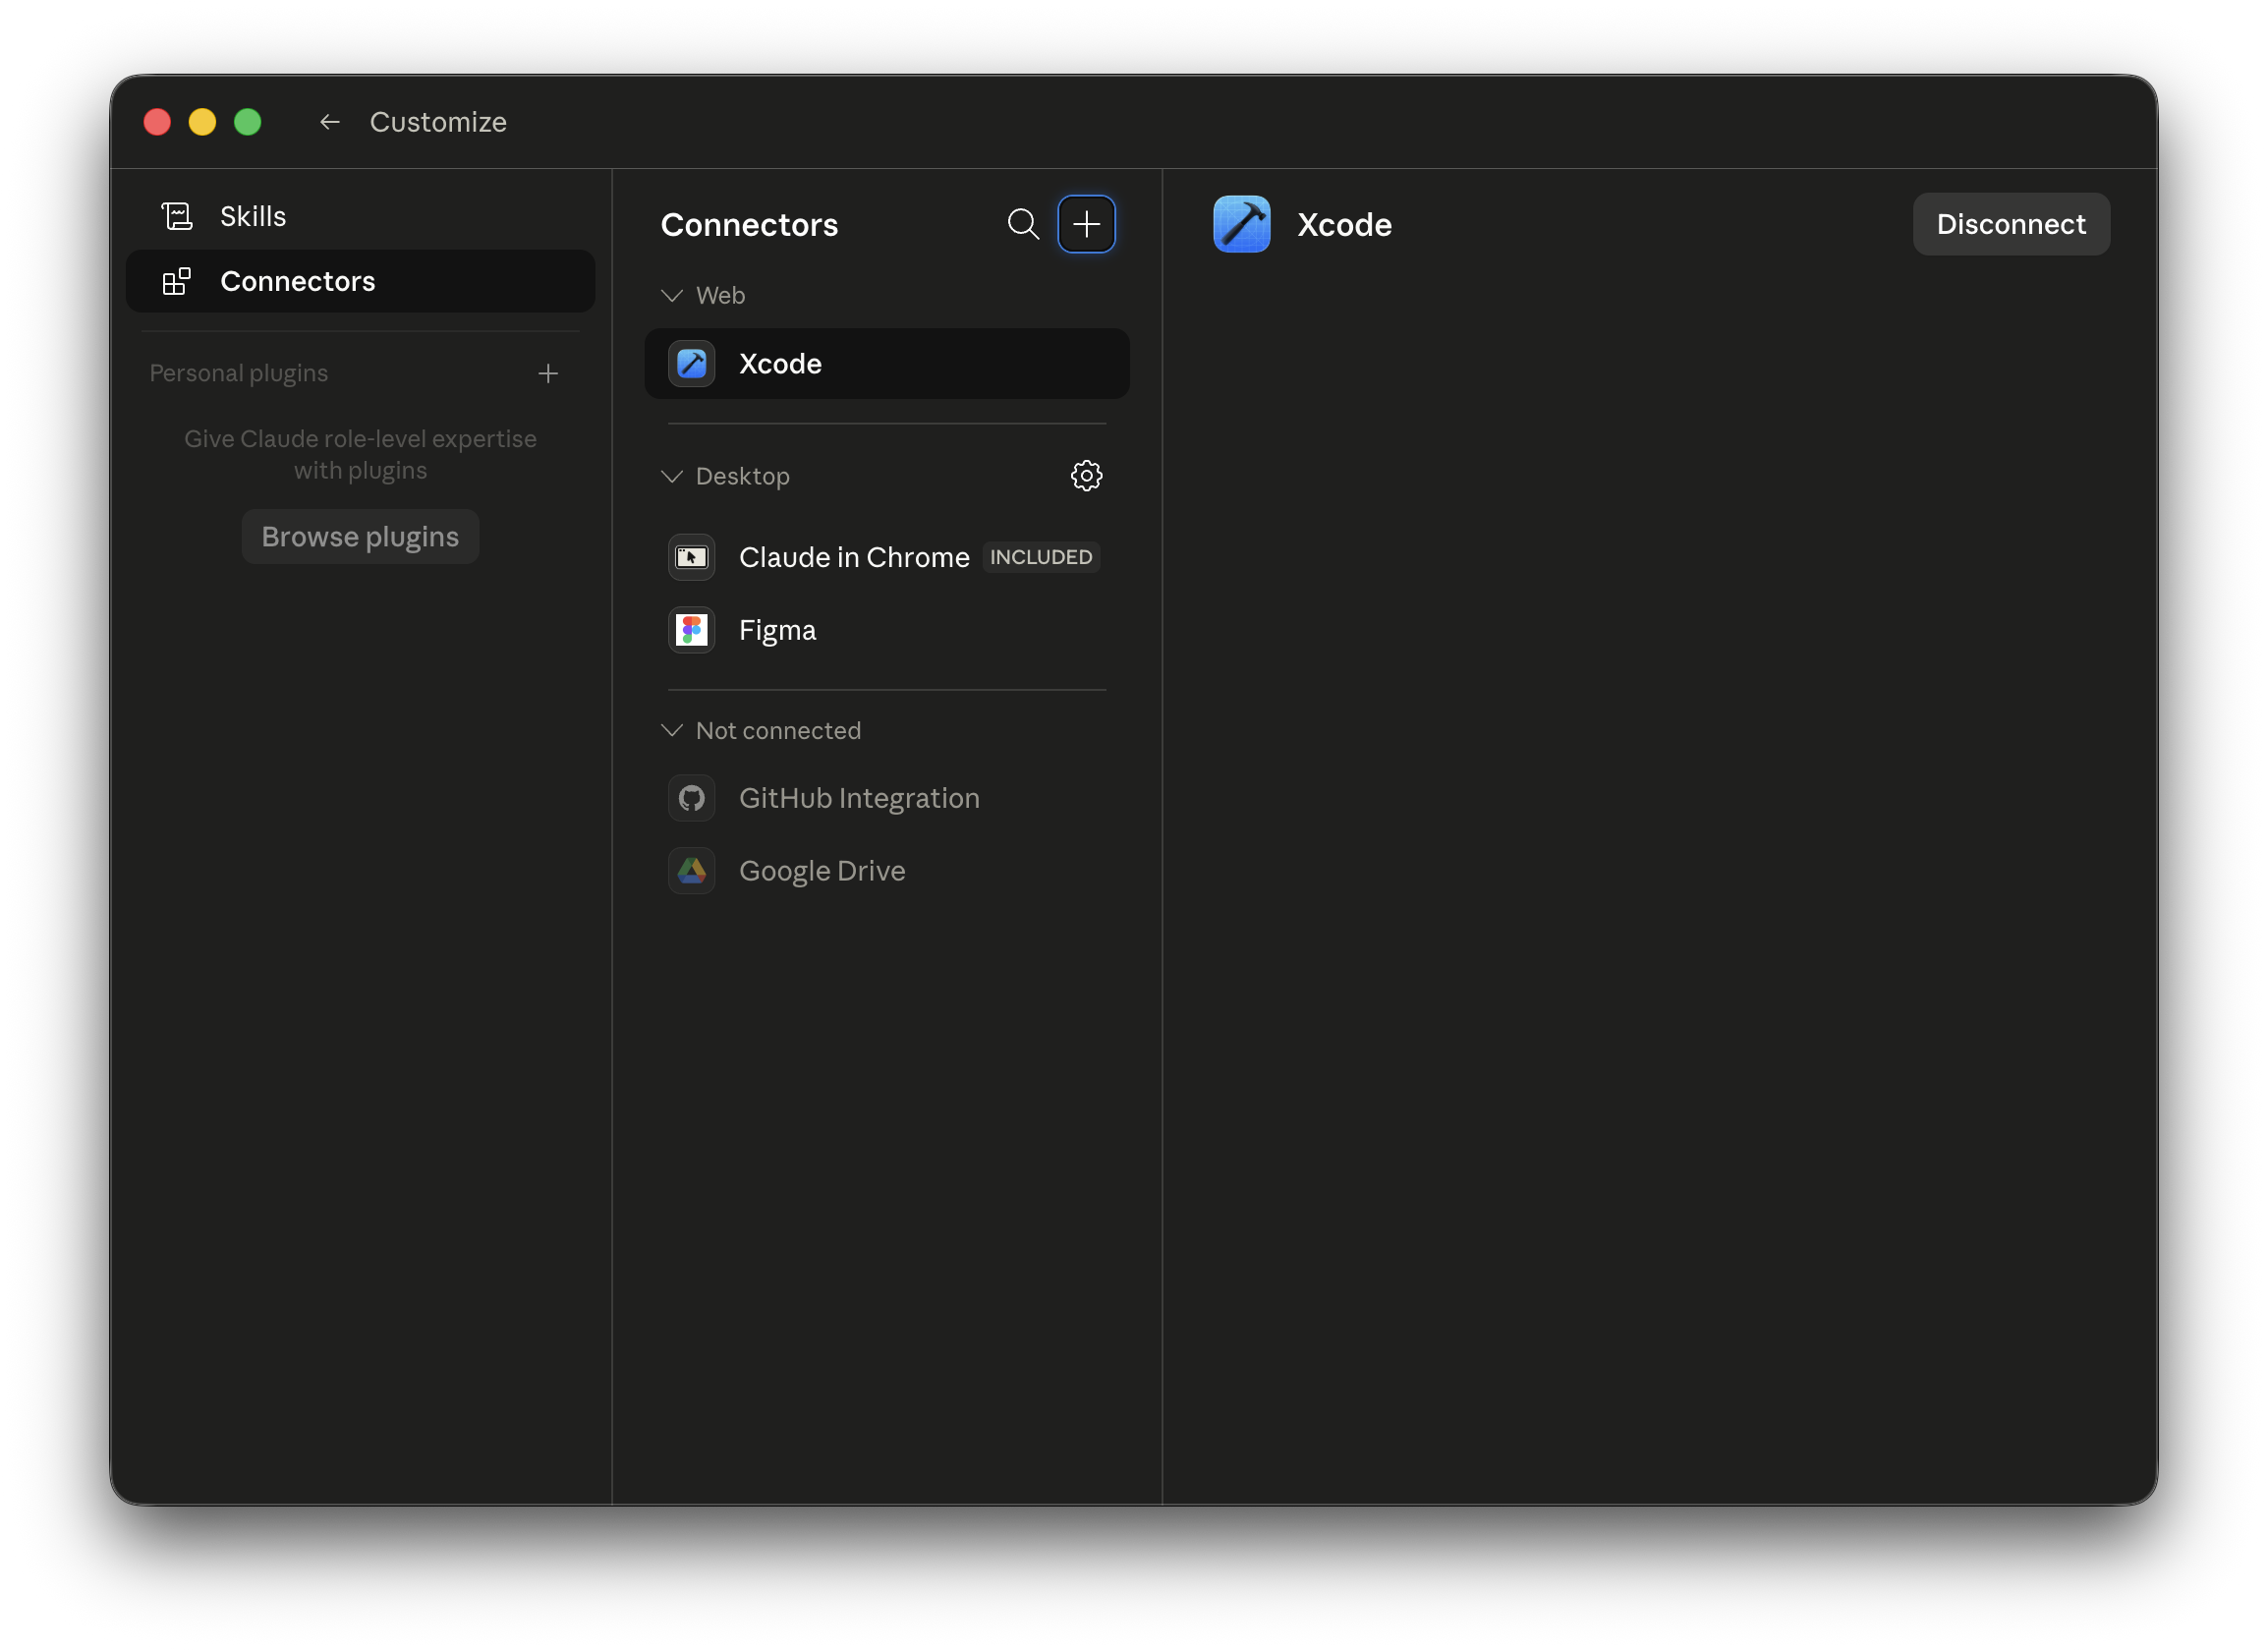
If you desire to have Claude talk to Xcode's MCP server then this can be done from within the Claude desktop app by specifying Xcode as a connector.
## The power of a good Agents.md
The Agents.md file is the work horse of the interactions and it is where you tell the coding agent about how to navigate and understand your app.
Like any other LLM interaction, the Agents.md file is a list of instructions for how to interact with your app.
One of the big advantages though comes by splitting out those instructions into separate files. Doing so will allow the agent to apply the correct instructions to your code.
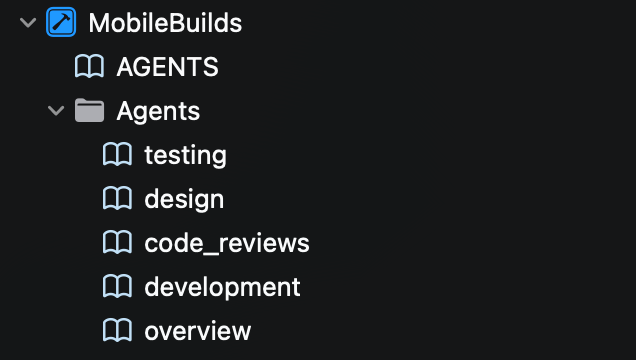
These can be specified from within the Agents.md file like the following.
```markdown
# AGENTS.md
## Instructions
- An overview of the project can be found at: @Agents/overview.md
- Developer process can be found at @Agents/development.md - use this when working on the codebase.
- Code review instructions can be found at @Agents/code_reviews.md - use this when reviewing code changes.
- Testing criteria and instructions can be found at @Agents/testing.md - use this when writing tests and running tests for verification.
- Design guidelines and instructions can be found at @Agents/design.md - use this when writing views
```
## Upskilling
Within the iOS community there are a large range of skills that people have provided. One that often gets mentioned is the [SwiftUI Agent Skill](https://github.com/twostraws/swiftui-agent-skill) from Paul Hudson.
There are a lot of different ways to install and manage skills so they are available to both Claude and Xcode.
One thing worth noting though is that blindly trusting a skill from someone will inevitably lead to issues in understanding what your code does and why. By all means use the skills, but keep track of the changes that are being made to the skill and critically assess what it is encouraging as far as behaviour.
The majority of skills are open source and available, so if your teams requirements differ from what the skill recommends, fork the skill and make changes to better suite what your team desires.
## Rinse, repeat, try again
There's a lot that can be done with agentic tooling. A well written Agents.md file is just the start of it. A big requirement though is as your team writes more and more code using agentic development practices, you need to keep the Agents.md and any skills associated with it updated.
<!-- page: https://cuteios.dev/2026/05/10/shell-scripts/ -->
---
title: "Writing shell scripts for Xcode Cloud"
description: "Allowing Xcode Cloud to run shell scripts"
url: "https://cuteios.dev/2026/05/10/shell-scripts/"
source: "https://cuteios.dev/2026/05/10/shell-scripts.md"
date: "2026-05-10"
author: "Amy"
site: "Amy is a cute iOS Developer"
language: "en"
license: "CC BY 4.0 (prose), MIT (code samples)"
---
# Writing shell scripts for Xcode Cloud
We all love Xcode Cloud for just how simple it makes getting up and running with automated tests. Once your source code is connected to Xcode Cloud (yeah, I use GitHub here) you end up defining what gets run as far as tests and archive actions.
Apple provides [documentation](https://developer.apple.com/documentation/xcode/developing-a-workflow-strategy-for-xcode-cloud) that covers best practices around defining workflows.
As with much documentation, it covers a very simple approach to getting up and going. There is a lot more you can do with a CI environment and that is where shell scripts fit in.
## Scripts directory
Xcode Cloud will look for scripts to run in the `ci_scripts` directory and these will follow a specific naming convention.
- `ci_post_clone.sh` is run just after your code is cloned and useful for doing any changes that might be required before building your app
- `ci_pre_xcodebuild.sh` is run just prior to building your app. If you need to pre-compile any dependencies, this is a good location.
- `ci_post_xcodebuild.sh` is run just after Xcode builds your app.
## Environment variables
Environment variables are how you find out specific bits of data relating to the Xcode Cloud process. You can also use the workflow editor to add in custom variables that are useful for authenticating any API requests such as uploading build artifacts to third party services.
Apple maintains [documentation](https://developer.apple.com/documentation/xcode/environment-variable-reference) about the environment variables which are available.
## Building a script to generate release notes
Let's take a look at an example script that will generate a release on GitHub with details about the changes made.
This script will sit in the `ci_scripts` directory and form part of `ci_post_xcodebuild.sh`.
### Running on merges to main
The first check for this script is to make sure that we only create a release when a merge is made to the `main` branch as a result of a PR being merged. We also check that the action performed by Xcode Cloud was `archive`.
```shell
# --- Guards: skip cleanly when this isn't a post-merge archive of main. ----
if [[ "${CI_XCODEBUILD_ACTION:-}" != "archive" ]]; then
echo "Skipping tag: CI_XCODEBUILD_ACTION='${CI_XCODEBUILD_ACTION:-unset}', not 'archive'."
exit 0
fi
if [[ "${CI_BRANCH:-}" != "main" ]]; then
echo "Skipping tag: CI_BRANCH='${CI_BRANCH:-unset}', not 'main'."
exit 0
fi
if [[ -n "${CI_PULL_REQUEST_NUMBER:-}" ]]; then
echo "Skipping tag: PR build (#${CI_PULL_REQUEST_NUMBER}), not post-merge."
exit 0
fi
```
### Creating the tag details
The second part of the script is to make sure that all environment variables are set and that we then go and create the details about the tag. This looks at the current marketing version of the app as well as the build number from Xcode Cloud.
```shell
require_var() {
local name="$1"
if [[ -z "${!name:-}" ]]; then
echo "ERROR: required env var '$name' is not set." >&2
exit 1
fi
}
require_var ACCESS_TOKEN
require_var CI_BUILD_NUMBER
require_var CI_COMMIT
require_var CI_ARCHIVE_PATH
require_var CI_PRIMARY_REPOSITORY_PATH
ARCHIVE_INFO="$CI_ARCHIVE_PATH/Info.plist"
if [[ ! -f "$ARCHIVE_INFO" ]]; then
echo "ERROR: archive Info.plist not found at $ARCHIVE_INFO" >&2
exit 1
fi
MARKETING_VERSION=$(/usr/libexec/PlistBuddy \
-c "Print :ApplicationProperties:CFBundleShortVersionString" \
"$ARCHIVE_INFO")
TAG="${MARKETING_VERSION}-${CI_BUILD_NUMBER}"
```
**note** the variable `ACCESS_TOKEN` is set via the workflow editor in Xcode and is the GitHub personal access token that gets used to create the release.
### Prepare to create the release
This is where we do the authentication setup to make sure we can talk to GitHub. It constructs the auth header and makes sure that the remote url is valid. There is also a check to see if the tag exists. If it does, the script cleanly exits.
```shell
# --- Resolve owner/repo from the checkout's origin remote. -----------------
REMOTE_URL=$(git -C "$CI_PRIMARY_REPOSITORY_PATH" config --get remote.origin.url)
REPO=$(printf '%s' "$REMOTE_URL" \
| sed -E -e 's#^git@github\.com:##' -e 's#^https://github\.com/##' -e 's#\.git$##')
if [[ -z "$REPO" || "$REPO" == "$REMOTE_URL" ]]; then
echo "ERROR: could not parse owner/repo from remote URL '$REMOTE_URL'." >&2
exit 1
fi
echo "Preparing GitHub release $TAG for $REPO at commit $CI_COMMIT."
# --- GitHub API helpers. ---------------------------------------------------
API="https://api.github.com/repos/$REPO"
AUTH_HEADERS=(
-H "Authorization: Bearer $ACCESS_TOKEN"
-H "Accept: application/vnd.github+json"
-H "X-GitHub-Api-Version: 2022-11-28"
)
# Idempotency: if the tag already exists, do nothing. Protects against
# workflow re-runs on the same commit.
existing_status=$(curl -sS -o /dev/null -w "%{http_code}" \
"${AUTH_HEADERS[@]}" "$API/git/ref/tags/$TAG")
if [[ "$existing_status" == "200" ]]; then
echo "Tag $TAG already exists on $REPO; nothing to do."
exit 0
fi
```
### Create the release and tag.
This is where things get created by performing a few http requests.
```shell
# --- Create the release (also creates the underlying tag). -----------------
response_body=$(mktemp)
trap 'rm -f "$response_body"' EXIT
payload=$(cat <<JSON
{
"tag_name": "$TAG",
"target_commitish": "$CI_COMMIT",
"name": "$TAG",
"generate_release_notes": true
}
JSON
)
http_code=$(curl -sS -o "$response_body" -w "%{http_code}" \
-X POST "${AUTH_HEADERS[@]}" \
-d "$payload" \
"$API/releases")
if [[ "$http_code" -lt 200 || "$http_code" -ge 300 ]]; then
echo "ERROR: GitHub release creation failed (HTTP $http_code)." >&2
cat "$response_body" >&2
exit 1
fi
echo "Created GitHub release $TAG."
```
## What else can be done
Shell scripts are super versatile and there's lots which can be done. In my case it was a desire to keep track of what goes into each release of the app. Automation is amazing for this and making use of Xcode Cloud is perfect.
<!-- page: https://cuteios.dev/2026/04/24/instruments/ -->
---
title: "The right instrument for the job"
description: "Making use of instruments to understand the cost of FoundationModels interactions"
url: "https://cuteios.dev/2026/04/24/instruments/"
source: "https://cuteios.dev/2026/04/24/instruments.md"
date: "2026-04-24"
author: "Amy"
site: "Amy is a cute iOS Developer"
language: "en"
license: "CC BY 4.0 (prose), MIT (code samples)"
---
# The right instrument for the job
## Why using instruments is important
When dealing with any interactions on a mobile device such as an iPhone, iPad or Vision Pro, it is important to have user interactions be responsive. Glitches, hitches, jumps and flashes should be avoided. These result in your app feeling janky and lack any delight for the user.
The Instruments app is what's used for measuring app interactions. First introduced in 2007 as part of Xcode 3.0, it has grown in the availability of instruments that it exposes.
With the introduction of Foundation Models in 2025, it gained the ability to measure usage of session interactions to get insight into how it is being used and where you as a developer can make improvements to your code.
## Setting up the Instrument
The first step when using instruments is to profile your app. This is done by selecting "Profile" from the Product menu.
You will then be prompted to choose a template for the Instruments session. I tend to go for "Time Profile" as it provides some common instruments you can use.
As the Foundation Models instrument doesn't have a default template, you can use whichever one you think is best for your use case.
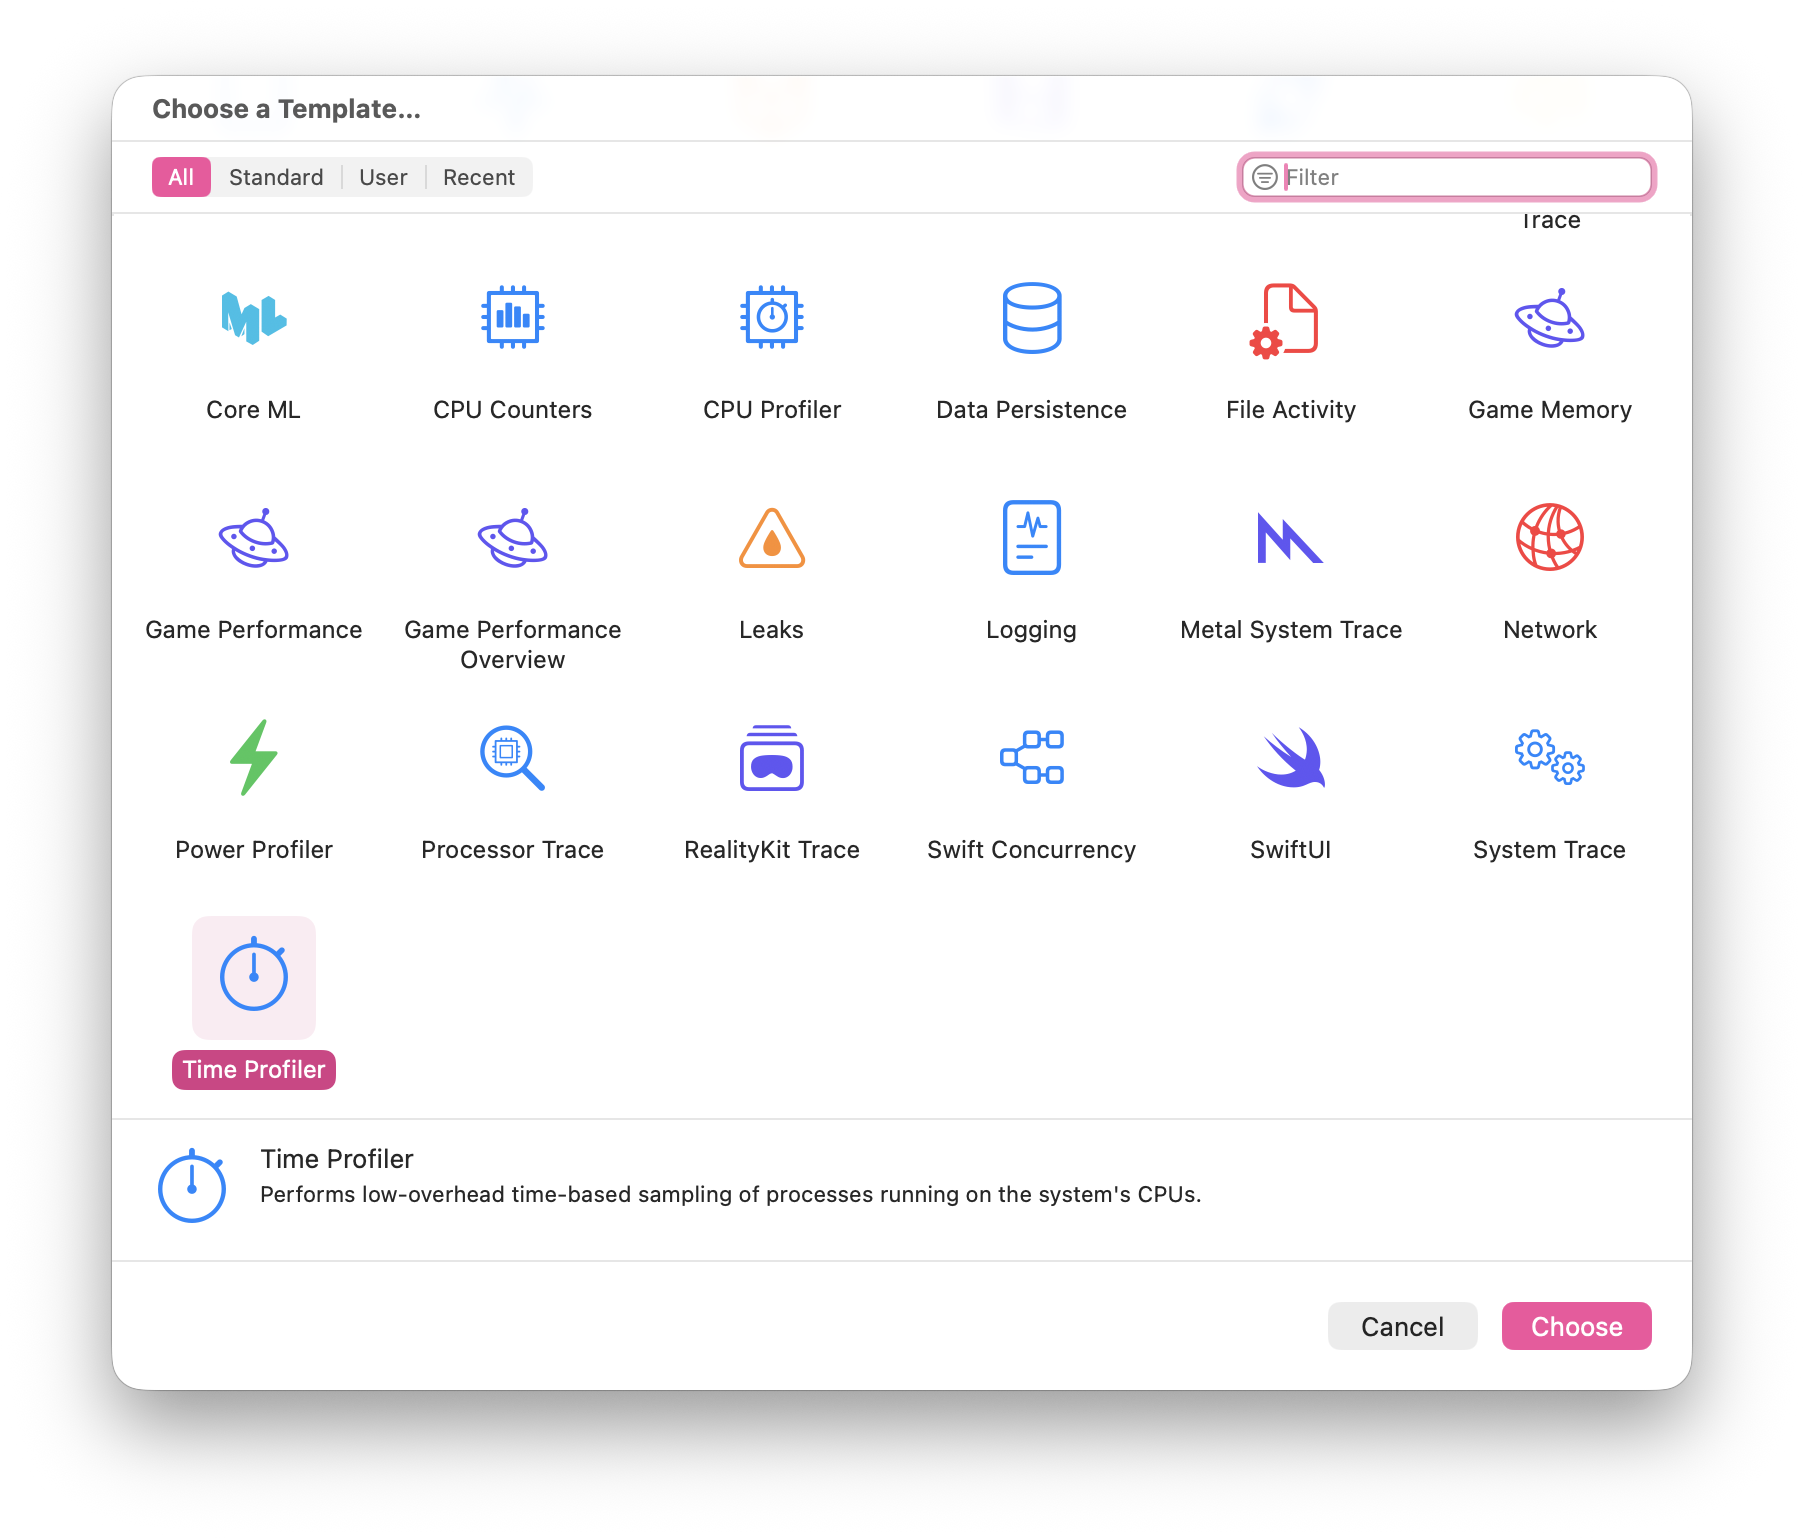
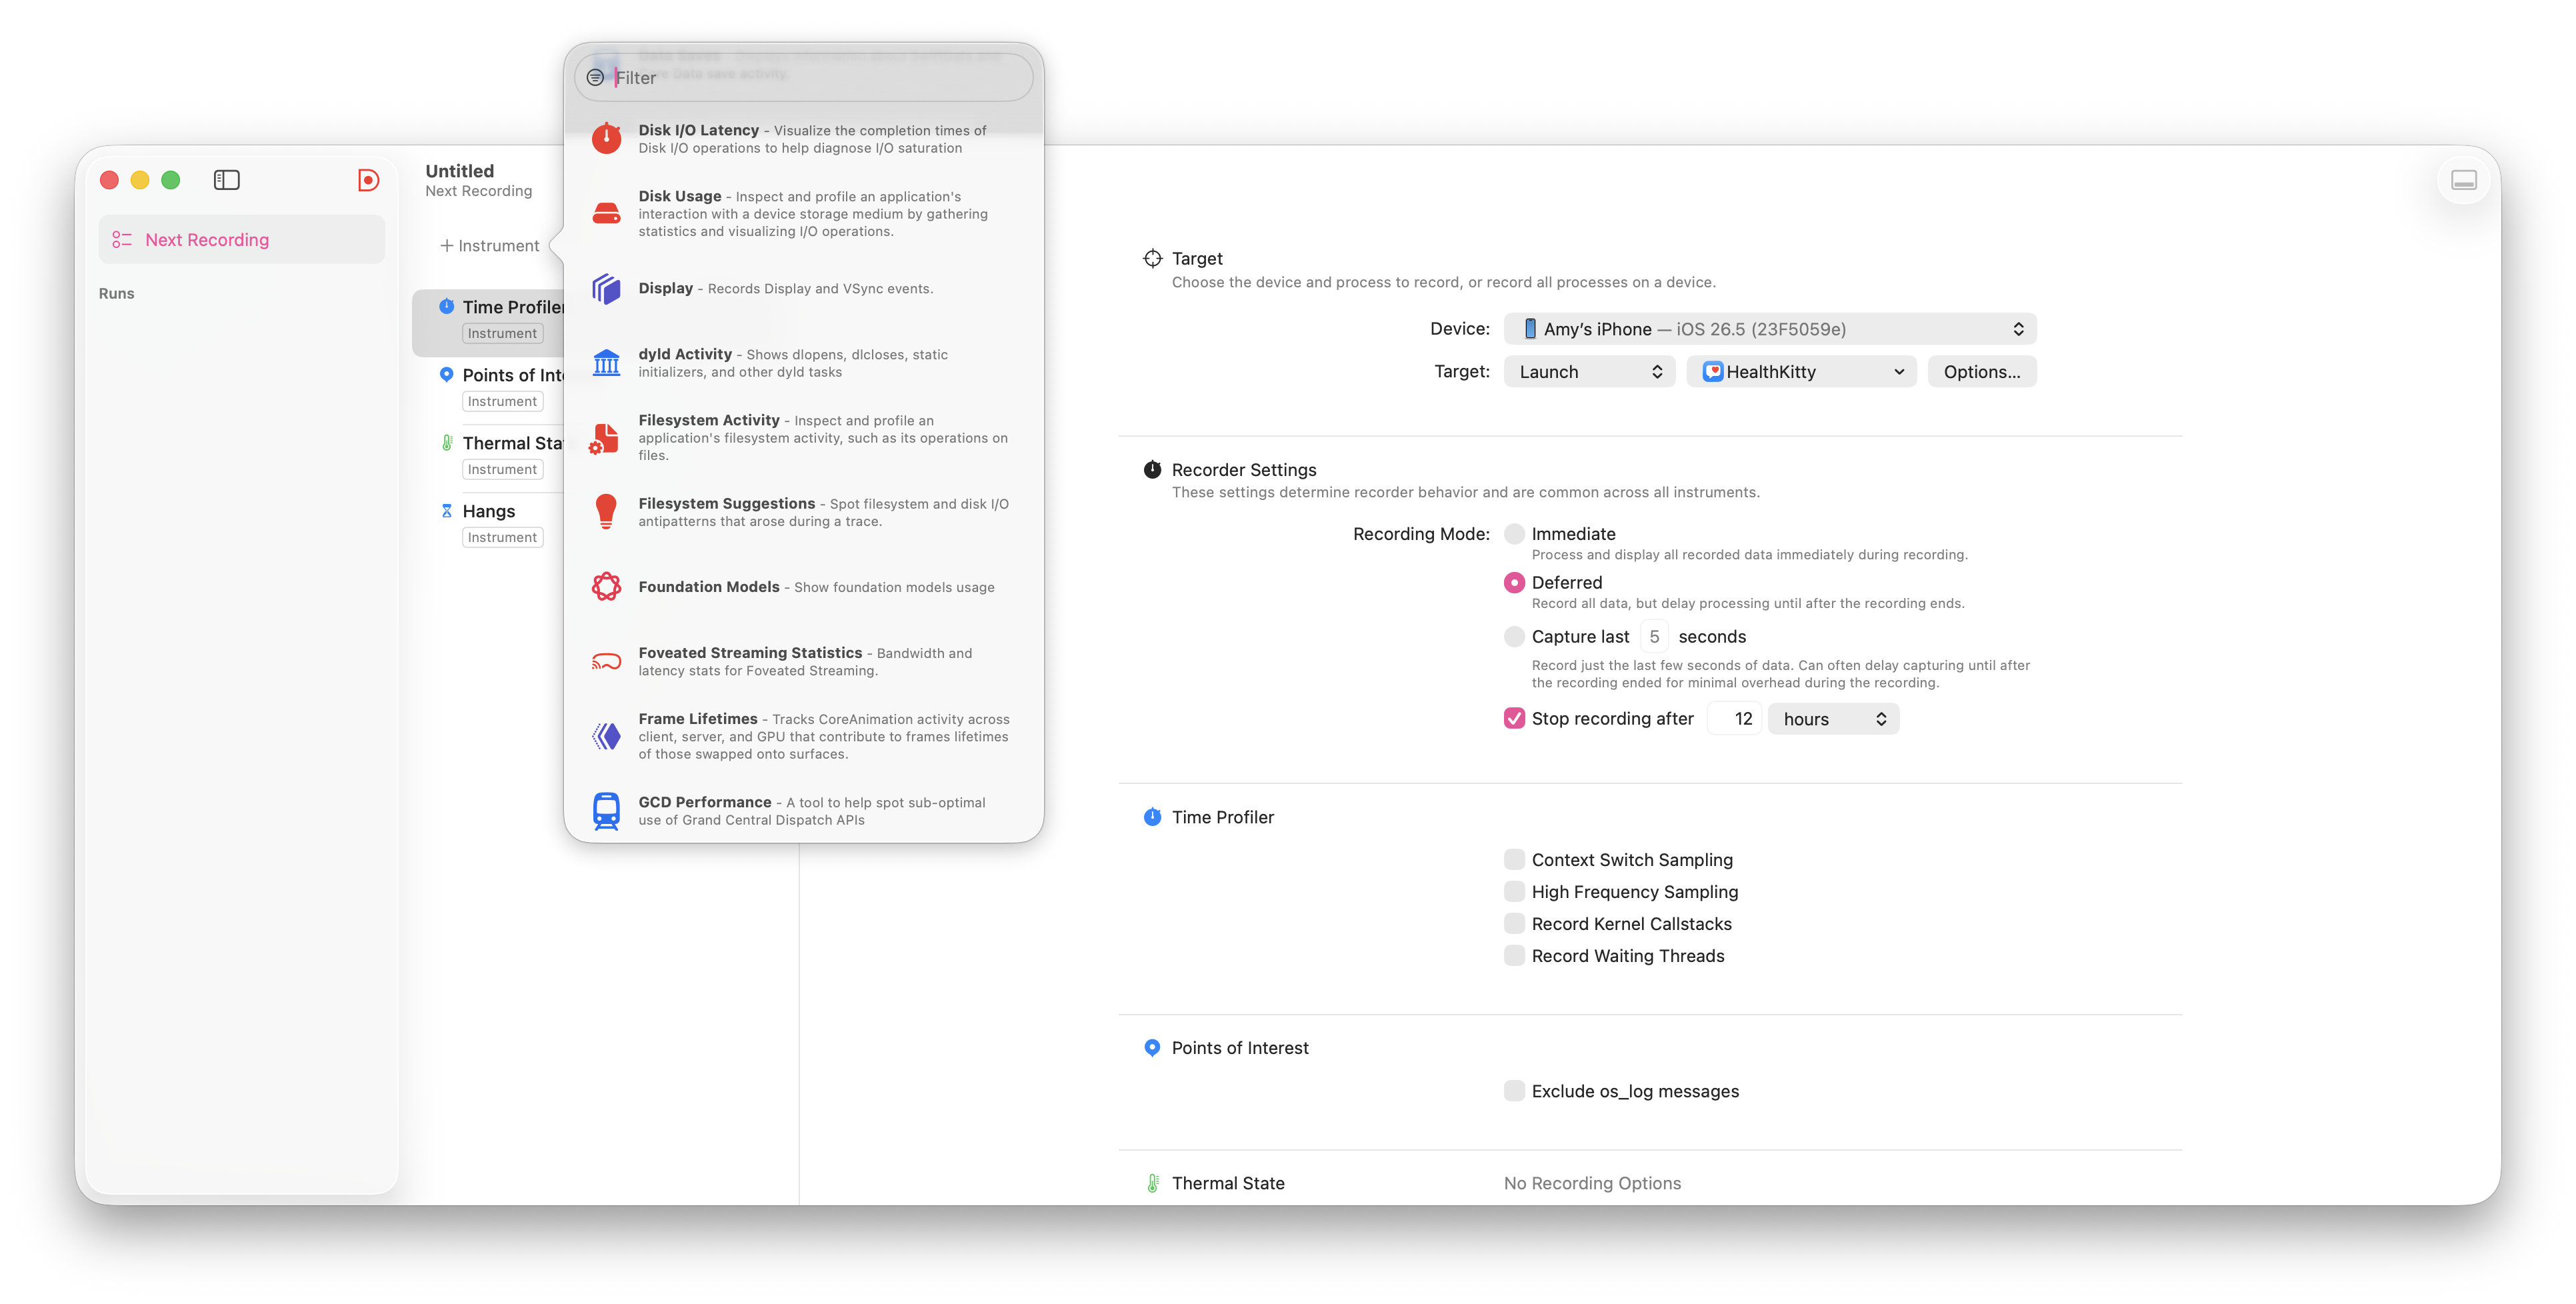
Once you have a template chosen, you will then need to add the foundation models instrument. This is achieved by clicking on "+ instrument" which will allow you to select from a variety of different instruments.
The one you're after is called "Foundation Models".
## Obtaining the recording
You can now start the recording and see what is happening. If you choose "immediate" then you get the output as you interact with the app.
For any Foundation Models usage you need to be running the app on a physical device. You can get limited data via the iOS simulator but the token count is unfortunately zero when the simulator is the target.
As the usage is recorded, it will populate details about access to Foundation Models alongside any other instruments you have running. An example recording looks like the following.
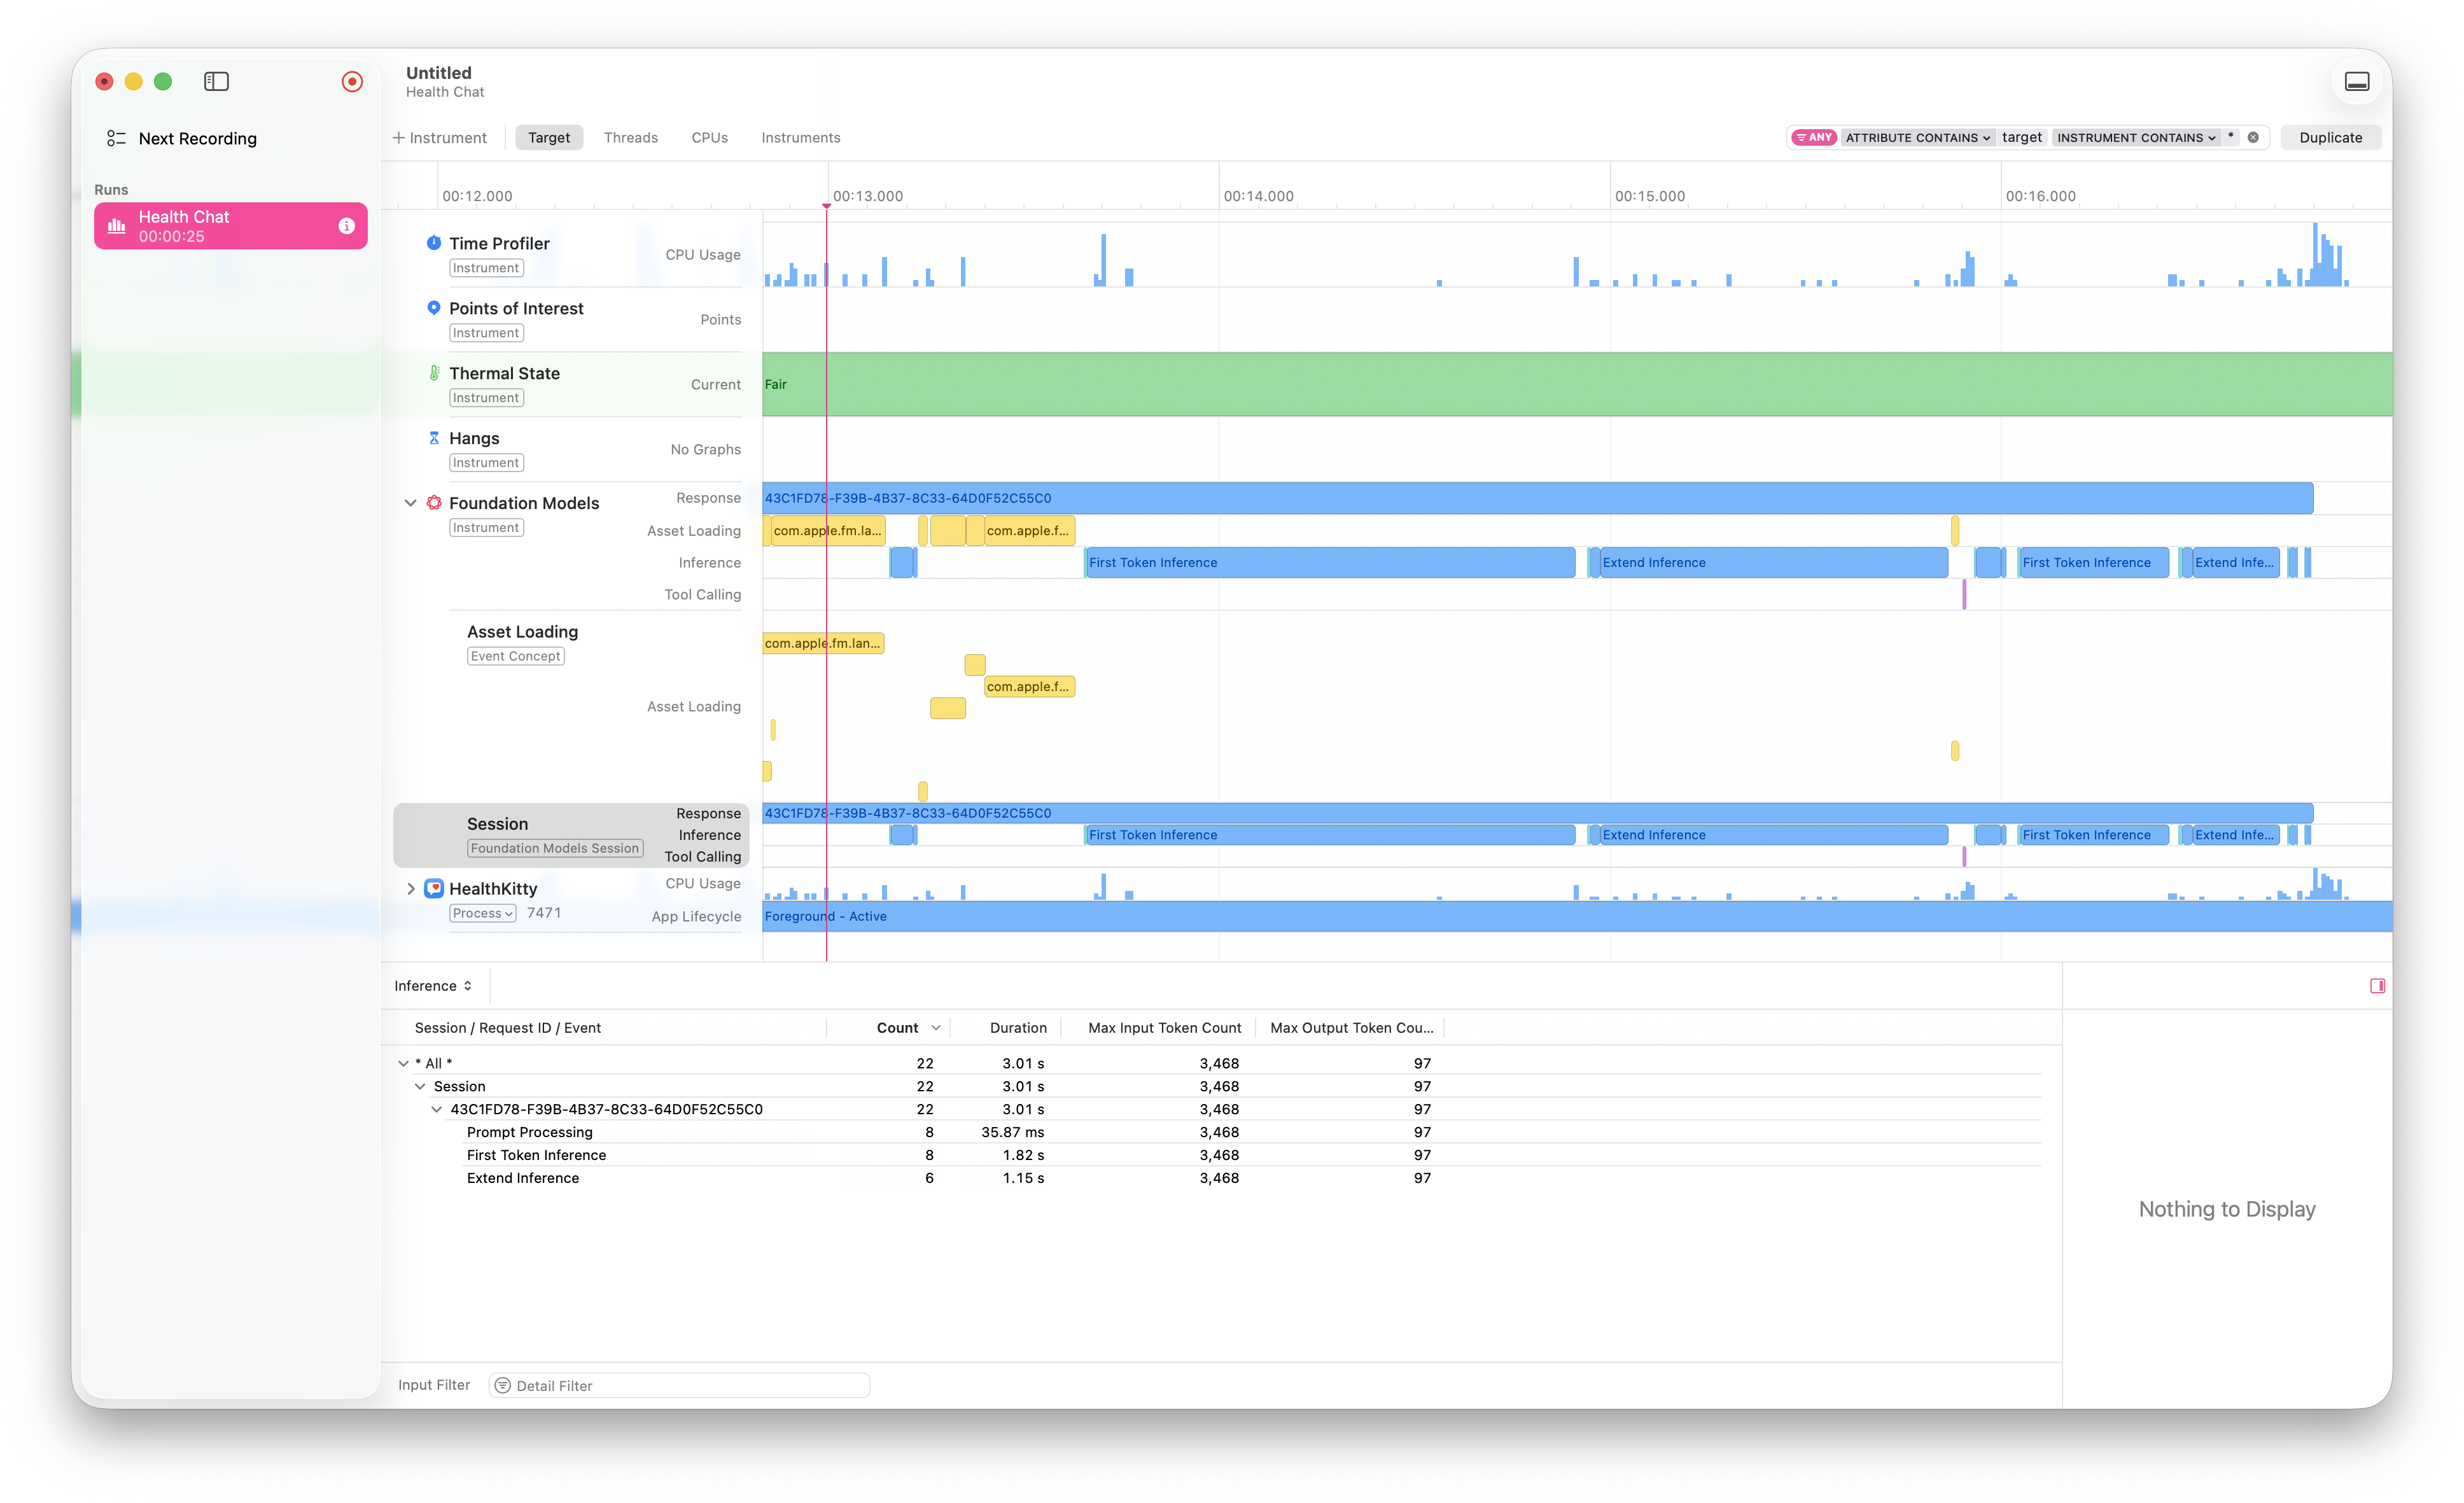
## Looking at the usage
There is a lot of details captured so lets break down the importance of each data point.
### Max Input Token Count
This is an estimate of the number of tokens consumed by prompts, instructions and tools that exist as part of the session.
### Max Output Token Count
Like the input token count, this is an estimate of the number of tokens consumed by the response
### Tool calling
This is the time taken to perform the tool calls required by the session. If you're dealing with HealthKit or anything that is variable, you are familiar with how these calls can go from less than a second to over a couple of minutes.
### First Token Inference
This is the best measure of responsiveness in the session as it is the time taken to generate the first token in the response. The sooner this happens, the more responsive the UI feels to the user.
### Extended Inference
A measure of the time spent on reasoning and verification. If this value is high then the model is spending a lot of time "thinking".
## Updating the usage in your app
Using instruments is an amazing way to understand just what is going on, but the key thing is how do you improve usage of Foundation Models within your app. This changes from app to app but general advice includes:
- Prewarming your sessions.
- Limit tokens used for instructions, prompts and tool calls.
- Cache responses from tool calls that can take a very long time.
So all up, use the right instrument for the job and create an app that is a delight for the users.
## Apple Documentation
- [Analyzing the runtime performance of your Foundation Models app](https://developer.apple.com/documentation/foundationmodels/analyzing-the-runtime-performance-of-your-foundation-models-app)
<!-- page: https://cuteios.dev/2026/04/15/previews/ -->
---
title: "The trait of a good look"
description: "Make sure your previews look their best by implementing `PreviewModifier` and `PreviewTrait`"
url: "https://cuteios.dev/2026/04/15/previews/"
source: "https://cuteios.dev/2026/04/15/previews.md"
date: "2026-04-15"
author: "Amy"
site: "Amy is a cute iOS Developer"
language: "en"
license: "CC BY 4.0 (prose), MIT (code samples)"
---
# The trait of a good look
It's always important to have the right style in any look you go for. The right background. The right shadow. The right fit. The right feel. But by default, any use of a SwiftUI preview lacks all of these. It's just the view, there without adornment for the world to see. So how can these be improved and built upon?
The answer to that is the use of traits and specifically [PreviewTrait](https://developer.apple.com/documentation/DeveloperToolsSupport/PreviewTrait). So let's unpack things a bit.
## PreviewModifier
The first step is to create a modifier that will provide the look and style of the preview. It acts in the same way as [ViewModifier](https://developer.apple.com/documentation/swiftui/viewmodifier) that can be used on a View, but has the ability to also provide a [Context](https://developer.apple.com/documentation/SwiftUI/PreviewModifier/context). The context is what allows you to provide extra data such as setting up a database or creating appropriate mocks for the view.
### Consider a spherical modifier in a vacuum
By default, the definition of [PreviewModifier](https://developer.apple.com/documentation/swiftui/previewmodifier) will define an associated type for Context as Void. This means that the modifier is just providing a look but avoiding the feel.
```swift
public struct BlackBackgroundModifier: PreviewModifier {
public func body(content: Content, context: Void) -> some View {
content
.background(Color.black)
}
}
```
As with [ViewModifier](https://developer.apple.com/documentation/swiftui/viewmodifier) it is typical to provide a convenience function for it so that it can be used. This would be defined like:
```swift
public extension PreviewTrait where T == Preview.ViewTraits {
static var blackBackground: Self = .modifier(BlackBackgroundModifier())
}
```
To make use of this new trait, we provide it when defining the [Preview](https://developer.apple.com/documentation/SwiftUI/Preview(_:traits:_:body:)).
```swift
#Preview(traits: .blackBackground) {
YourAmazingView()
}
```
### Giving it all a bit of love and feeling
A reference is all good and useful, but the view doesn't feel alive unless it has the data it usually expects when it exists within your app. A typical approach here is when using [SwiftData](https://developer.apple.com/documentation/swiftdata) you can provide the Context as a [ModelContainer](https://developer.apple.com/documentation/swiftdata/modelcontainer). This is the example that is seen everywhere online, but to be honest it can be any type you want. The idea is that the Context gets created once and then it is reused throughout the Canvas lifecycle showing the Preview(s).
So lets work through this example. It sets up a model container and provides it to the view. You can get access to the Context from within the [body](https://developer.apple.com/documentation/swiftui/previewmodifier/body(content:context:)) function and then apply it to the view.
```swift
struct PreviewSampleData: PreviewModifier {
static func makeSharedContext() throws -> ModelContainer {
let config = ModelConfiguration(
isStoredInMemoryOnly: true
)
do {
let container = try ModelContainer(
for: FeelGoodJournalEntry.self,
configurations: config
)
try addSampleData(to: container)
return container
} catch {
fatalError("Couldn't create container: \(error.localizedDescription)")
}
}
func body(content: Content, context: ModelContainer) -> some View {
content.modelContainer(context)
}
}
```
## The sky is the limit
So this is a simplified for teaching example of how a [PreviewModifier](https://developer.apple.com/documentation/swiftui/previewmodifier) and [PreviewTrait](https://developer.apple.com/documentation/DeveloperToolsSupport/PreviewTrait) can be used to provide look and feel to your previews. From here, it's a matter of exploring and seeing how you can use them to improve the experience of your development within Xcode.
<!-- page: https://cuteios.dev/2026/04/06/migrations/ -->
---
title: "One thing leads to another"
description: "As your app grows make sure your data comes along for the ride"
url: "https://cuteios.dev/2026/04/06/migrations/"
source: "https://cuteios.dev/2026/04/06/migrations.md"
date: "2026-04-06"
author: "Amy"
site: "Amy is a cute iOS Developer"
language: "en"
license: "CC BY 4.0 (prose), MIT (code samples)"
---
# One thing leads to another
## A tale as old as time
Since the introduction of iPhone SDK 3.0 developers have been dealing with data migrations on mobile devices. As mobile apps grow, their data requirements change alongside them and being on top of migrations is a black art that even the most current LLM has difficulty with.
## The reliance on magic
When SwiftData was introduced in 2023, it brought with it a new approach to migrations being [SchemaMigrationPlan](https://developer.apple.com/documentation/swiftdata/schemamigrationplan) that allows for programatically migrating between versions. Those who have dealt in the dark arts of CoreData migrations know that there exists [blog posts](https://www.objc.io/issues/4-core-data/core-data-migration/) and also official [apple documentation](https://developer.apple.com/library/archive/documentation/Cocoa/Conceptual/CoreDataVersioning/Articles/vmLightweightMigration.html) on the matter. The difference being that with SwiftData, the approach is a lot more approachable.
Where as CoreData relied on mapping files to handle migrations, in SwiftData there is a definite gotcha there where the often used examples say to just put the [@Model](https://developer.apple.com/documentation/swiftdata/model()) macro everywhere with abandon in order to get the magic. This works great if you know that you'll only ever do lightweight migrations, but if you need to change anything more substantially, this approach relies to much on magic.
Adoption of [VersionedSchema](https://developer.apple.com/documentation/swiftdata/versionedschema) is a way to avoid but if you're app is already in the wild then you need to take a few extra steps to bring everything into line with versioned schemas.
## Defining the schemas
The first step is to define all your existing SwiftData models in a VersionedSchema. This can look like the following. The important part to remember is that this first version should match your existing models exactly.
```swift
public struct Version1: VersionedSchema {
public static let models: [any PersistentModel.Type] = [
Version1.One.self,
Version1.Two.self,
Version1.Three.self,
]
public static let versionIdentifier = Schema.Version(1, 0, 0)
public init() {
}
}
```
By making use of the `Version1` struct you can namespace your types. A public typealias will then allow for continuing to use the existing types without code change. This is also a good chance to define `CurrentVersion` as a type so that when you move between versions, the references in your code don't require change.
```swift
public typealias CurrentVersion = Version1
public typealias One = CurrentVersion.One
public typealias Two = CurrentVersion.Two
public typealias Three = CurrentVersion.Three
```
When creating your model container, you can then make use of the new VersionedSchema definition.
```swift
let schema = Schema(versionedSchema: CurrentVersion.self)
let modelConfiguration = ModelConfiguration(
schema: schema,
isStoredInMemoryOnly: false,
cloudKitDatabase: .private("iCloud.your.app.data")
)
let container = try ModelContainer(
for: schema,
configurations: modelConfiguration
)
```
### Not so fast
If you are going from a non versioned schema to a versioned schema, you will unfortunately hit an error when creating the model container `"Cannot use staged migration with an unknown model version."`. This error is unfortunately not well documented, but there is a common work around you can use. The trick is to explicitly load the `Version1` schema first and then continue with any other migrations.
```swift
do
{
return try liveModelContainer()
} catch SwiftDataError.loadIssueModelContainer {
do {
let legacySchema = Schema(versionedSchema: Version1.self)
let legacyModelConfiguration = ModelConfiguration(
schema: legacySchema,
isStoredInMemoryOnly: false,
cloudKitDatabase: .none
)
let legacyContainer = try ModelContainer(
for: legacySchema,
configurations: [legacyModelConfiguration]
)
try legacyContainer.mainContext.save()
return try liveModelContainer()
} catch {
// Log and handle any other errors here
}
}
```
At this point, you should be able to successfully load your data as a versioned schema without any issues.
## And on and on and on and on
As apps grow in size, you will want to define a [SchemaMigrationPlan](https://developer.apple.com/documentation/swiftdata/schemamigrationplan) to allow you to constantly grow your apps data requirements.
As with anything there are a few caveats when using a schema migration plan. The majority of things will hopefully be covered by a [.lightweight](https://developer.apple.com/documentation/swiftdata/migrationstage/lightweight(fromversion:toversion:)) [MigrationStage](https://developer.apple.com/documentation/swiftdata/migrationstage).
When you need to start modifying your data or changing it between app versions, this can get tricky and you will need to make use of a [.custom](https://developer.apple.com/documentation/swiftdata/migrationstage/custom(fromversion:toversion:willmigrate:didmigrate:)) migration stage.
```swift
public class AppMigrationPlan: SchemaMigrationPlan {
public static var schemas: [any VersionedSchema.Type] {
[
Version1.self,
Version2.self,
]
}
public static var stages: [MigrationStage] {
[
migrateV1toV2,
]
}
static let migrateV1toV2: MigrationStage = .custom(
fromVersion: Version1.self,
toVersion: Version2.self
) { context in
// Your Version1 models are available here
} didMigrate: { context in
// Your Version2 models are available here
}
}
```
The important thing to remember is that you can't access anything from your old schema version inside of the `didMigrate` closure as the schema has already changed at that point. So if you are wanting to move data from `var foo` to a combination of `var baz` and `var blorp` then you will need to store this data as part of the `willMigrate` closure so that it is retained. You can then set it on the corresponding versioned model in `didMigrate` and save the changes.
There's a lot of hand waving here, but that's intentional. The specific requirements of migrations aren't what's important. The important thing is to get your app into a versioned schema and then start writing the migrations.
<!-- page: https://cuteios.dev/2024/03/09/shared-music/ -->
---
title: "The music we share with friends."
description: "Having some fun with friends while listening to music"
url: "https://cuteios.dev/2024/03/09/shared-music/"
source: "https://cuteios.dev/2024/03/09/shared-music.md"
date: "2024-03-09"
author: "Amy"
site: "Amy is a cute iOS Developer"
language: "en"
license: "CC BY 4.0 (prose), MIT (code samples)"
---
# The music we share with friends.
### It was a dark and stormy stardate 57162.3
The girl slumped down in her office chair. The meeting was over and once again it had been one of those meetings. But that's okay, she knew how to deal with them and how to regain control of her emotions afterwards. One of the group chats she was in served as a great outlet stress and they were all her chosen family. It was a safe place for all of them to vent about what's going on in life. The second thing she needed was some music.
She queued something up on her HomePod's and closed her eyes waiting for the bass to drop and the stress to start slowly leaving her body as the music took hold. Opening her eyes again, she moved to the next step in the ritual. She wanted to share the music she was listening to with the group as it was relevant to her outpouring of emotions and regaining control.
This time though, she was confronted by issues. She had to go looking for the song in music.app and then navigate to the share sheet so that she could simply get the URL for the track she wanted to share. It was all too much and she threw up her arms in frustration, letting out a high pitched wail of frustration. There had to be a better way of handling this situation.
### File -> New Project
Once the inevitable break down had subsided, the girl was spurred into action. She had a problem to solve and would not be satisfied until a situation had presented itself. There had to be an easier way to share the music with her friends. Her mental health depended on it. Well, maybe not depend on but it was a distraction.
Breaking apart the task, there were a few things that needed to be accomplished so she could start sharing the music she listened to with her friends.
* Obtaining permission
* Finding out the playback history
* Creating a UI
* Sharing the track
* Access from anywhere
A plan set out, it was now time for the girl to get to work.
### Setting up the project
Surprisingly this turned out to be the most complex of the issues to address. The girl had to set up a complete project in the [Apple Developer portal](https://developer.apple.com/account) in order to get access to MediaKit from within her application. While impressed by the structure of the MusicKit API, she was caught out by how it interacted with lower level parts of apples platforms. Like [WeatherKit](https://developer.apple.com/documentation/weatherkit/) and [ShazamKit]() the [MusicKit]() framework made use of a system daemon that handled things such as caching and authentication for all apps making use of the framework. She let a relaxed smile appear on her face having realised this. The extra steps involved were there for a purpose and meant that the task of having her app remain a good citizen when using the MusicKit API was handled by the platform. She noted down the [documentation link](https://developer.apple.com/documentation/musickit/using_musickit_to_integrate_with_apple_music) in her notebook that constantly sat open by her side (what girl doesn't have a stack of notebooks just sitting around with random things contained therein?)
### Obtaining permission
A grin crept across the girls face. She had the project set up. She was now ready to get going with the fun part of the project. She would be able to write some code. There would be unit tests, there would be comments. The structure would flow like a well choreographed dance number. Grace, elegance, fluidity. All the things that reflect the girls nature and attitude towards life. Everything about her gets poured out into the work she does.
First up, she needed to ask the for the users permission to access the music library on behalf of the user. This is always an important step as accessing user data without permission is an invasion of the user privacy. She remembered the stories about peoples data being harvested and sold and she didn't want anything about that. Thankfully, there was a type in MusicKit helpfully labeled as [MusicAuthorization](https://developer.apple.com/documentation/musickit/musicauthorization) that contained exactly what she needed.
While reading the documentation, she noticed that there needed to be a property list value added to the `info.plist` file labeled [NSAppleMusicUsageDescription](https://developer.apple.com/documentation/bundleresources/information_property_list/nsapplemusicusagedescription). When requesting authorisation, the text associated with this value is presented to the user. It makes clear what the consent is being requested and why it is being requested.
Well, she thought to herself, that's another point for relying on the platform to take care of the heavy lifting. She doesn't need to make her own implementation. Let's test this out she sang to herself and proceeded to place some code into the view model (structure is important and all business logic gets separated out from the view).
```swift
let status = switch await MusicAuthorization.currentStatus {
case .authorized:
.authorized
case .restricted:
.restricted
case .denied, .notDetermined:
MusicAuthorization.request()
@unknown default:
break
}
if case .authorized = status || case .restricted = status {
// Handle request here
}
```
On the first run, she let out a cheer as the prompt appeared to ask for consent. Forward momentum is always a good thing.
### Finding out the playback history
Knowing that she could access the music library she could now ask questions of it. These questions were done using a request / response handshake. Thankfully she could make use of the generic types to create a specific query and get the response crafted to her liking. This was a powerful side of the swift programming language that she always enjoyed using. [MusicRecentlyPlayedRequest](https://developer.apple.com/documentation/musickit/musicrecentlyplayedrequest) was the type that she needed for the request and looking at it, she could see that it was generic over the type of [MusicItem](https://developer.apple.com/documentation/musickit/musicitem/) that included things like [Album](https://developer.apple.com/documentation/musickit/album), [Playlist](https://developer.apple.com/documentation/musickit/playlist), [Song](https://developer.apple.com/documentation/musickit/song) and [Track](https://developer.apple.com/documentation/musickit/track) that were perfect for her needs. She could easily customise the apps behaviour to show any of these or even more as long as it conformed to the correct protocol. Another point to well designed API's.
With the request created, she then needed to get a response. There was a corresponding response to the request available to her that she could make use of. This was [MusicRecentlyPlayedResponse](https://developer.apple.com/documentation/musickit/musicrecentlyplayedresponse). So it was now time for the girl to get to writing some more code.
```swift
var request = MusicRecentlyPlayedRequest<Track>()
request.limit = 1
let response = try await request.response()
guard let track = response.items.first else {
throw Errors.noRecentlyPlayed
}
// Do something with the track data returned
```
### Creating a UI
With the data now flowing to her app, it was time to create the UI. As the girl had selected a multiplatform app when creating the project, there was only one approach to take for the UI and that was to use [SwiftUI](https://developer.apple.com/documentation/swiftui) as it meant she could be expressive in how she built the UI and know that the platform running the app would happily translate the UI to something appropriate for its conventions and behaviours. Gone were the days having to splatter `#if os(macOS)` all throughout the codebase and have multiple targets each with their own quirks and conventions.
To get started, the girl envisioned a simple UI. One that started by showing information over delight. She would move onto that at some stage, but for now she was content on getting things on the screen first.
```swift
VStack(alignment: .center, spacing: 12) {
AsyncImage(url: song.imageURL) { image in
image
.resizable()
.frame(width: 400, height: 400)
} placeholder: {
ProgressView()
.progressViewStyle(.circular)
}
Text(song.title)
Text(song.artist)
HStack {
if let shareURL = song.shareURL {
ShareLink(item: shareURL)
}
Button("Copy", systemImage: "doc.on.doc") {
viewModel.copyToPasteboard()
}
}
}
```
### Sharing the track
It was here that the girl was faced with a choice. Did she want to implement the standard platform behaviour of a [Share Sheet](https://developer.apple.com/design/human-interface-guidelines/collaboration-and-sharing/) that provided the most extensible way of getting the information about the album / track / song / playlist to others? Did she want to just copy the URL to the clipboard so that she could paste it where she wanted? A lot of her current frustration for building the new app stemmed from the lack of discoverability around the share sheet in Apple's Music app and how it introduced many extra steps to completing the task at hand. She also understood that a URL often lacks the extra information required when sharing. In the end, she needed to provide both options to the users. The first option, using a share sheet, could be achieved by using the [ShareLink](https://developer.apple.com/documentation/SwiftUI/ShareLink) type in SwiftUI and letting the platform take care of the nuance around presentation.
The second option required a bit more nuance as [NSPasteboard](https://developer.apple.com/documentation/appkit/nspasteboard/) and [UIPasteboard](https://developer.apple.com/documentation/uikit/uipasteboard/) had their own quirks and the girl needed to resort to having different behaviour between. Thankfully the differences weren't substantial. The girl also took note that the pasteboard was for more than just string and binary values. She could be expressive with the data she provided and that would let other apps determine if and how they responded to a paste event. For her app, specifying that the pasteboard was handling a URL was sufficient.
```swift
#if os(macOS)
NSPasteboard.general.setString(url.absoluteString, forType: .URL)
#else
UIPasteboard.general.url = url
#endif
```
### Access from anywhere
At last the girl could get the song she was listening to could be shared easily with her friends. But there were quirks. Apple's platforms were great for multitasking, but they still needed switching between apps. You could scatter multiple windows over the desktop on macOS but you still had to switch between them. On iOS and iPadOS there was a need to switch between them as well. Thankfully on macOS the problem could be addressed by the use of [MenuBarExtra](https://developer.apple.com/documentation/swiftui/menubarextra/) as a scene within the app. On iOS and iPadOS she would need to look for other solutions.
```swift
MenuBarExtra("Your App Name", systemImage: "music.note.list") {
// UI goes here
}
.menuBarExtraStyle(.window)
```
### Taking it further
The girls voice rang out in jubilation. She had a solution to her problem and she was keen to share it with the world at large. Her friends first as they received the test flight link and then she put her mind to releasing the app once feedback had been received. This is where her passion lies, her delight is found. Her voice. Her song.
**narrators note** app is still being finalised though will be released at some point in the future.
<!-- page: https://cuteios.dev/2024/01/10/viewbuilder/ -->
---
title: "A Girl and her @ViewBuilder"
description: "Making use of ViewBuilder in SwiftUI"
url: "https://cuteios.dev/2024/01/10/viewbuilder/"
source: "https://cuteios.dev/2024/01/10/viewbuilder.md"
date: "2024-01-10"
author: "Amy"
site: "Amy is a cute iOS Developer"
language: "en"
license: "CC BY 4.0 (prose), MIT (code samples)"
---
# A Girl and her @ViewBuilder
***note***: the story here is fictional, but it's an approach I love to take when solving similar problems. Hope you enjoy it and get a good understanding of how make use of `@ViewBuilder` in SwiftUI apps.
## Once upon a time
One upon a time, a girl was presented with a task. Refactor this code her manager demanded, another team is wanting to reuse this part of the UI. "Happy to" she responded, knowing that there was no getting out of this work. 'Tis much better to build this well and share it around than have many implementations of the same thing with very small differences between them. None of which quite solving the problem. Loading up a [Riot Grrrl](https://music.apple.com/au/playlist/riot-grrrl-essentials/pl.4ac9566eba234d99971cface91950c1c) playlist in Apple Music, she pulled down the latest version of the codebase and began to work. The code she found wasn't the best. If it were, she wouldn't be doing this task now would she? She had seen this kind of code many times before. A few different components wrapped up in what would colloquially be described as a card. There was a [VStack](https://developer.apple.com/documentation/swiftui/vstack) with the different bits and pieces stuck in there along with a fairly standard set of [view modifiers](https://developer.apple.com/documentation/swiftui/viewmodifier).
## Understanding the requirements
There are many approaches the girl could take to solving this problem. One option would be to rename the existing view, expose properties for things like title, image, text and throw it into a shared part of the project. But she knows well and true that will only cause pain down the track. She needs a way to make the content arbitrary while maintaining style and functionality. This will give her the best base component to allow others to build upon.
## Looking at alternatives
In her time working on apps built in SwiftUI the girl knew of a few solutions she could apply to make this all work as she wanted
- view builders
- view extensions
- view modifiers
#### View Modifiers
View modifiers have been around since the start of SwiftUI and have been a long established way of applying a common set of modifications to a view. The girls team has experience with this and she knows there will be little cognitive overhead for them to pick up the preferred way of doing this. So how would this look to her teammates? This is always an important question to ask and so she opened up a [Swift Playground](https://developer.apple.com/swift-playgrounds/) (We all remember those things right? More than just for WWDC scholarship applications) and started roughing out what it would be.
```swift
public struct CardModifier: ViewModifier {
func body(content: Content) -> some View {
content
.frame(maxWidth: .infinity, alignment: .leading)
.fixedSize(horizontal: false, vertical: true)
.padding(8)
.background(Color.background)
.mask(RoundedRectangle(cornerRadius: 8, style: .continuous))
}
}
```
And then it's usage in a view
```swift
Text("Hello World")
.modifier(CardModifier())
```
But is this as good as it could be? The girl sat there in her chair, one leg tucked under her in a posture that confounds her colleagues and sipped on the tea she had recently poured for herself. A miracle that she remembered to take a break and spend time contemplating next steps. She knew that this would solve a problem, but would it encourage the team to use it and have an understanding of what is being accomplished? She gazed at her Swift Playground a bit more, but was not satisfied she could answer that question in the affirmative. One approach down, on to the next one.
#### View Extensions
Knowing that SwiftUI is very idiomatic, the girl started to ponder the question "What if this was an extension on View?". Thankfully this one could be proven viable or not by a simple addition to her open Swift Playground.
```swift
extension View {
func displayAsCard() -> some View {
modifier(CardModifier())
}
}
```
This then gave her the freedom to apply it to any view type and have it understandable that the view itself was being displayed as a card. But she knew, even this didn't have what she was looking for. It was a single change to an existing View in the app but it lacked discoverability and had a high cognitive overhead on her colleagues. She didn't want to make life more difficult for her friends that she interacted with ever day. Well, there was one who was super annoying but what work environment doesn't have people like that in them. The girl shuddered and as she was still holding her tea for warmth in both hands took a calming sip of tea. Thankfully, she knew of a solution and where she wanted to go with this bit of work.
#### View Builders
Each year the girl spent a good amount of her time travelling the world and speaking with others in the industry. She had to be super careful in this as the environments could very easily be toxic. She was there to learn more about what she loved doing day to day. A repeated theme amongst conversations is how Swift as a language allows for the writing of DSL's and this was a super powerful technique to use when writing apps with SwiftUI. She had heard of the idea about [result builders](https://docs.swift.org/swift-book/documentation/the-swift-programming-language/advancedoperators/#Result-Builders) and their specific application in SwiftUI being [@ViewBuilder](https://developer.apple.com/documentation/swiftui/viewbuilder). Needing a refresher before continuing, she queued up a few WWDC videos on the topics being [Write a DSL in Swift using result builders](https://developer.apple.com/wwdc21/10253) and [Embrace Swift generics](https://developer.apple.com/wwdc22/110352) that deal with the topic. She couldn't help but be excited that both presenters in the videos were female. With how much progress had been made in recent years, there was still a long way to go towards gender equality.
The girl now had the approach she wanted to take sorted out. She fetched yet another cup of tea and got to work on the solution.
```swift
struct Card<Content: View>: View {
let configuration: CardViewConfiguration
let content: Content
init(configuration: CardViewConfiguration = .default, @ViewBuilder content: () -> Content) {
self.configuration = configuration
self.content = content()
}
var body: some View {
content
.frame(maxWidth: .infinity, alignment: .leading)
.fixedSize(horizontal: false, vertical: true)
.padding(configuration.padding)
.background(configuration.backgroundColor)
.mask(
RoundedRectangle(
cornerRadius: configuration.cornerRadius,
style: .continuous
)
)
}
}
struct CardConfiguration {
public let backgroundColor: Color
public let cornerRadius: CGFloat
public let padding: CGFloat
public init(backgroundColor: Color, cornerRadius: CGFloat, padding: CGFloat) {
self.backgroundColor = backgroundColor
self.cornerRadius = cornerRadius
self.padding = padding
}
}
```
This had the advantage of being usable within the app in a way to simply described what was being created and allowed others to build what they want on top of it.
```swift
Card {
Text("Hello World")
}
```
## Bringing the team on board
Satisfied with how the use of ViewBuilder came out, the next step for the girl was to bring her team onboard with the approach. She could slap together a PR and send it up for others to review, but that wouldn't achieve much. If others were to start adopting a similar approach in how they wrote views, she would need to give them as much help as possible. This was more than just chatting with other engineers. Now it was time for a checklist. She still had a lot of work to do to ensure adoption by others.
- Chat with UX designers about upcoming usages.
- Chat with accessibility experts about how it would look for vision impaired users.
- Inline documentation that covers example usage.
- Brown bag (small talk / meeting at work) covering the usage of `@ViewBuilder` in the app and other possibilities for the use of similar DSL's.
- Work with engineers as they adopt the new UI component and adopted similar patterns in their work.
The girl leaned back in her chair, cup of tea firmly grasped in both hands. It will go unmentioned how many she had consumed throughout this day. She was satisfied that she had met the requirements of the work and the team is now in a better place.
<!-- page: https://cuteios.dev/2024/01/05/formatters/ -->
---
title: "Formatters and Measurements"
description: "Using custom formatters in SwiftUI"
url: "https://cuteios.dev/2024/01/05/formatters/"
source: "https://cuteios.dev/2024/01/05/formatters.md"
date: "2024-01-05"
author: "Amy"
site: "Amy is a cute iOS Developer"
language: "en"
license: "CC BY 4.0 (prose), MIT (code samples)"
---
# Formatters and Measurements
## Why data is important
Data is what makes apps viable. It is what drives the user interactions and informs them of what's going on. While some apps use data in the form of text, there are other apps that use very fine grained measurements and need to present these in ways that are appropriate for the user.
## Respecting the users locale
When dealing with data relating to measurements we want to be respectful of the users locale and language settings. If we have a value that has been recorded as meters per second and the users default measurement for speed is miles per hour, we want to respect that when we display the value to the user. Similarly if a temperature measurement is in degrees Kelvin, we want to format that in the users default value such as Celsius or Fahrenheit.
## Creating a custom Formatter
A lot of formatters already exist and are provided by as part of the respective platforms and should be preferred over a custom implementation of [Formatter](https://developer.apple.com/documentation/foundation/formatter/). There is also [sample code](https://developer.apple.com/documentation/foundation/data_formatting/building_a_localized_food-ordering_app) from Apple which demonstrates the use of formatters in an app.
Though there are times when we want to take a string such as "ABCD1234EFGH5678" and turn it into something like "ABCD-1234-EFGH-5678" which is then displayed to the user. To do this, we want to create a custom formatter. This sounds complex, but it is as a straight forward and the good thing is that the implementation can be unit tested.
### Define the subclass
To get started, define a new value type such as the following.
```swift
class SuperAwesomeCustomFormatter {
}
```
### Create the implementation
After defining the class, we can build out the implementation. The amazing thing about how this protocol is defined is that it doesn't case what the value being passed in is. It is the responsibility of the formatter to determine if it knows how to provide an appropriate String as a result.
```swift
extension SuperAwesomeCustomFormatter: Formatter {
override func string(for obj: Any?) -> String? {
/*
super secret custom implementation goes here okay,
just make sure you return an optional String value.
The actual implementation is left as an exercise
for the reader to look at.
*/
nil
}
}
```
The [Formatter](https://developer.apple.com/documentation/foundation/formatter) class provides the definition [string(for:)](https://developer.apple.com/documentation/foundation/formatter/1415993-string) as well as [attributedString(for:withDefaultAttributes:)](https://developer.apple.com/documentation/foundation/formatter/1409478-attributedstring) and [editingString(for:)](https://developer.apple.com/documentation/foundation/formatter/1416333-editingstring). This makes the Formatter subclass super powerful and adaptable to the use case. Do take note of the default behaviour discussion in the apple documentation if you are overriding these values.
### Write some unit tests
As we are dealing with formatting strings we want to make sure that it does what is expected. So for this we write some unit tests. These tests can be as simple or as complex as you want.
```swift
class SuperAwesomeCustomFormatterTests: XCTestCase {
func testFormatsString() {
let testSubject = SuperAwesomeCustomFormatter()
let expected = "1234-ABCD-4567-EFGH"
let result = testSubject.string(for: "1234ABCD4567EFGH")
XCTAssertEqual(expected, result)
}
}
```
## Showing formatted values
A lot of SwiftUI types work with a formatter such as [Text](https://developer.apple.com/documentation/swiftui/text/init(_:formatter:)-2he2c) and [TextField](https://developer.apple.com/documentation/swiftui/textfield/init(_:value:formatter:)-4013v). This is demonstrated by a super simple view like the following which presents a TextField and uses an appropriate custom formatter for the value.
```swift
struct ContentView: View {
@State var superAwesomeString: String = ""
var body: some View {
VStack {
TextField(
"Super Awesome Value",
value: $superAwesomeString,
formatter: .superAwesomeFormatter
)
}
.padding()
}
}
extension Formatter {
static var superAwesomeFormatter: Formatter = {
SuperAwesomeFormatter()
}()
}
```
<!-- page: https://cuteios.dev/2023/04/11/wwdc-wishlist/ -->
---
title: "WWDC 23 Wishlist"
description: "Amy's list of things that would be nice to see at WWDC"
url: "https://cuteios.dev/2023/04/11/wwdc-wishlist/"
source: "https://cuteios.dev/2023/04/11/wwdc-wishlist.md"
date: "2023-04-11"
author: "Amy"
site: "Amy is a cute iOS Developer"
language: "en"
license: "CC BY 4.0 (prose), MIT (code samples)"
---
# WWDC 23 Wishlist
Each year as it gets close to [wwdc](https://developer.apple.com/wwdc) developers love to speculate as to what they would love for Apple to release at their annual conference. I'll not get in to the out there rumours (mixed reality headset being the exception) but rather focusing on what would make my live a lot easier as an engineer.
## CoreData uplift
We have seen how amazingly flexible Swift as a language is, particularly how easy it is to create a DSL using result builders is. Having a database persistence layer available that feels native to Swift apps would be a huge win.
- Modern Swift API
- Generated classes use swift types (not NSSet)
- Thread and type safety
- async / await
## SwiftUI Previews from packages
This one has plagued developers for a long time. If you have a SwiftUI view defined in an SPM package along with a preview for the view, you can't use the canvas if your target is set to the main app. Yes you can change the target to be just the SPM package as a work around but that is really an unplesant experience for developers.
## SwiftUI Map enhancements
For building [RideStats.app](https://ridestats.app) I make use of the `Map` type in SwiftUI and it's amazing. It is rediculously limited though and is lacking 90% of the functionality that exists in the MapKit views.
- Polyline paths
- Overlays
- Every feature that MapKit has but in a SwiftUI View
## Mixed Reality headset
Everything makes sense for this to happen this year. I'm keeping my expectations open for just what it looks like but my guess is it will involve widgets and live activities somehow.
<!-- page: https://cuteios.dev/2023/04/08/heart-rate/ -->
---
title: "Showing heart rate in live activities"
description: "A quick and fun tutorial for how to show data from a bluetooth heart rate monitor in a live activity"
url: "https://cuteios.dev/2023/04/08/heart-rate/"
source: "https://cuteios.dev/2023/04/08/heart-rate.md"
date: "2023-04-08"
author: "Amy"
site: "Amy is a cute iOS Developer"
language: "en"
license: "CC BY 4.0 (prose), MIT (code samples)"
---
# Showing heart rate in live activities
Let's have some fun and get to understand two concepts. The first is bluetooth devices and the second is live activities. We'll be walking through some of the interesting parts of a demo app which is available on [GitHub](https://github.com/cuteiosdev/heart_rate_live) and seeing just what makes bluetooth devices behave and send data.
## What is Bluetooth?
Bluetooth is a wireless communication method defined by the [Bluetooth SIG](https://www.bluetooth.com) and is a great way for talking to peripherals that are mounted on a bike such as power meters and cadence sensors. We'll be talking to a heart rate monitor in this example.
On apple platforms, the framework used is [CoreBluetooth](https://developer.apple.com/documentation/corebluetooth). As well as providing abstractions around [Peripherals](https://developer.apple.com/documentation/corebluetooth/cbperipheral), [Services](https://developer.apple.com/documentation/corebluetooth/cbservice), and [Characteristics](https://developer.apple.com/documentation/corebluetooth/cbcharacteristic) it uses a [Central Manager](https://developer.apple.com/documentation/corebluetooth/cbcentralmanager) for discovering all of the peripherals that are around.
To start making use of bluetooth peripherals, you need to have an instance of [CBCentralManager](https://developer.apple.com/documentation/corebluetooth/cbcentralmanager) and a class (yeah, needs to be an NSObject subclass) that conforms to the [CBCentralManagerDelegate](https://developer.apple.com/documentation/corebluetooth/cbcentralmanagerdelegate).
## Discovering bluetooth devices
Before we start looking for peripherals, we want to make sure that the required hardware is available for use. Your app will be told about the state of the hardware via the delegate method [centralManagerDidUpdateState(_:)](https://developer.apple.com/documentation/corebluetooth/cbcentralmanagerdelegate/1518888-centralmanagerdidupdatestate).
```swift
public func centralManagerDidUpdateState(_ central: CBCentralManager) {
switch central.state {
case .poweredOn:
startScanningForPeripherals()
default: break
}
}
```
When the manager is asked to discover services we need to tell it what services it should be looking for. If we pass `nil` to [scanForPeripherals(withServices: options:)](https://developer.apple.com/documentation/corebluetooth/cbcentralmanager/1518986-scanforperipherals) we will see all peripherals. To limit these to just devices that support heart rate measurements, we use the service UUID of `180D` that is defined by the [heart rate service](https://www.bluetooth.com/specifications/specs/heart-rate-service-1-0/).
```swift
public func startScanningForPeripherals() {
guard manager.state == .poweredOn else {
return
}
manager.scanForPeripherals(withServices: [CBUUID(string: "180D")])
}
```
Now that we have asked the manager to scan for peripherals, we need to listen for what is found. As this happens at the discretion of the manager, we make use of the delegate function [centralManager(_:didDiscover:advertisementData:rssi:)](https://developer.apple.com/documentation/corebluetooth/cbcentralmanagerdelegate/1518937-centralmanager) to perform actions on the peripherals that we find.
```swift
public func centralManager(_ central: CBCentralManager, didDiscover peripheral: CBPeripheral, advertisementData: [String : Any], rssi RSSI: NSNumber) {
guard peripherals.contains(where: { $0.id == peripheral.identifier }) == false else {
return
}
peripherals.append(peripheral)
}
```
As the peripherals are discovered, we want to be able to connect to them so we can start receiving values from them. To do this, we ask the manager to [connect](https://developer.apple.com/documentation/corebluetooth/cbcentralmanager/1518766-connect) to a device. We then get the details of the connected peripheral in the delegate function [centralManager(_:didConnect:)](https://developer.apple.com/documentation/corebluetooth/cbcentralmanagerdelegate/1518969-centralmanager).
```swift
public func centralManager(_ central: CBCentralManager, didConnect peripheral: CBPeripheral) {
details = peripheral
}
```
Once the peripheral is connected, we then want to discover the services that are available on it. Doing this is requires that we first set the [delegate](https://developer.apple.com/documentation/corebluetooth/cbperipheral/1518730-delegate) property on the peripheral to a type that conforms to [CBPeripheralDelegate](https://developer.apple.com/documentation/corebluetooth/cbperipheraldelegate) which again needs to be a NSObject subclass. Once we have set the delegate we then need to call [discoverServices(_:)](https://developer.apple.com/documentation/corebluetooth/cbperipheral/1518706-discoverservices) on the peripheral using the `180D` UUID for heart rate monitors.
```swift
peripheral.discoverServices([CBUUID(string: "180D")])
```
The delegate method [peripheral(_:didDiscoverServices:)](https://developer.apple.com/documentation/corebluetooth/cbperipheraldelegate/1518744-peripheral) will then be called with the peripheral having its [services](https://developer.apple.com/documentation/corebluetooth/cbperipheral/1518978-services) property populated. We can then ask the peripheral to discover the characteristics for each of the services. When scanning for characteristics, we use the []() function on the peripheral instance passing it an instance of [CBService](https://developer.apple.com/documentation/corebluetooth/cbservice)
```swift
func peripheral(_ peripheral: CBPeripheral, didDiscoverServices error: Error?) {
peripheral.services?.forEach { service in
peripheral.discoverCharacteristics(nil, for: service)
}
}
```
We now have the required data and connection to start receiving values for our peripherals.
## Receiving data
As you can guess, our app is told about the discovered characteristics in the delegate method [peripheral(_:didDiscoverCharacteristicsFor:error:)](https://developer.apple.com/documentation/corebluetooth/cbperipheraldelegate/1518821-peripheral). There are two types of values which are available. We can either get a value if it is supported and this is great for static values on a device. We can also listen for notifications of when a value changes. This is what we want for heart rate monitors and other characteristics whose values change over time. To listen for a value update notification, we call the [setNotifyValue(_:for:)](https://developer.apple.com/documentation/corebluetooth/cbperipheral/1518949-setnotifyvalue) function on the peripheral.
```swift
func peripheral(_ peripheral: CBPeripheral, didDiscoverCharacteristicsFor service: CBService, error: Error?) {
guard service.uuid.uuidString == "180D" else {
return
}
guard let measurementCharacteristic = service.characteristics?.first(where: { $0.uuid.uuidString == "2A37" }) else {
return
}
peripheral.setNotifyValue(true, for: measurementCharacteristic)
}
```
The UUID for the characteristic representing heart rate measurements is `2A37` and is defined as part of the [heart rate service](https://www.bluetooth.com/specifications/specs/heart-rate-service-1-0/) specification. The format of the bytes we get in the [peripheral(_:didUpdateValueFor:error:)](https://developer.apple.com/documentation/corebluetooth/cbperipheraldelegate/1518708-peripheral) delegate function are defined in the same specification. Being familiar with this dance is important so that we can parse the values.
```swift
func peripheral(_ peripheral: CBPeripheral, didUpdateValueFor characteristic: CBCharacteristic, error: Error?) {
guard characteristic.uuid.uuidString == "2A37" else {
return
}
guard let data = characteristic.value else {
return
}
heartRate = formatter.valueForData(data)
}
```
The formatter is a helper type defined to extract the appropriate values from the raw Data instance that we get in the delegate function. This is defined as the following:
```swift
public func valueForData(_ data: Data) -> Int? {
let byteArray = [UInt8](data)
let firstBitValue = byteArray[0] & 0x01
if firstBitValue == 0 {
return Int(byteArray[1])
}
return (Int(byteArray[1]) << 8) + Int(byteArray[2])
}
```
## Live Activities
A lot of fun comes when we background the app and can show the current heart rate as either a live activity or using the dynamic island on supported devices.
### Handling background updates
To allow bluetooth to function in the background, we need to add some values to the `info.plist` file. These values are:
- [NSBluetoothAlwaysUsageDescription](https://developer.apple.com/documentation/bundleresources/information_property_list/nsbluetoothalwaysusagedescription) for a nice description of why we need to use bluetooth
- [Required Background Modes](https://developer.apple.com/documentation/xcode/configuring-background-execution-modes) must contain `App Communicates using Core Bluetooth`
- [Supports Live Activities Frequent Updates](https://developer.apple.com/documentation/bundleresources/information_property_list/nssupportsliveactivitiesfrequentupdates) set to true so we can send frequent updates
If you've used background fetches before, you would think that we need to handle background tasks. This isn't the case with CoreBluetooth and your `CBCentralManagerDelegate` conforming type will get called. When those delegate methods get called, it is possible to update the live activity.
### Sending data to the live activity
Both Live Activities and the Dynamic Island exist as widgets and make use of configurations to update the data that gets shown. These configurations are value types that conform to the `ActivityAttributes` protocol like the following:
```swift
public struct WidgetsAttributes: ActivityAttributes {
public typealias Content = ContentState
public struct ContentState: Codable, Hashable {
// Dynamic stateful properties about your activity go here!
public var heartRate: Int
public init(heartRate: Int) {
self.heartRate = heartRate
}
}
public init() {}
}
```
There are two parts to the attributes being the data which doesn't change regularly and then the frequently updated content. For showing the heart rate values we want to be setting the current value in the content. We do this when we receive a value in the `CBPeripheralDelegate.peripheral(_:didUpdateValueFor:error:)` function. We also want to check that live activities are supported which we do using the [areActivitiesEnabled](https://developer.apple.com/documentation/activitykit/activityauthorizationinfo/areactivitiesenabled) property on [ActivityAuthorizationInfo](https://developer.apple.com/documentation/activitykit/activityauthorizationinfo/) class. When updating the data for a live activity, we create a new content and then ask the activity to update using the content.
```swift
if ActivityAuthorizationInfo().areActivitiesEnabled {
let content = ActivityContent(state: WidgetsAttributes.ContentState(heartRate: heartRate ?? 0), staleDate: nil)
if activity == nil {
do
{
let attributes = WidgetsAttributes()
activity = try Activity.request(attributes: attributes, content: content)
} catch {
}
} else {
Task {
await activity?.update(content)
}
}
}
```
When we are finished displaying the heart rate, we want to end the activity so that it's not being displayed any longer.
```swift
Task {
await activity?.end(dismissalPolicy: .immediate)
}
```
<!-- page: https://cuteios.dev/2023/03/13/hello-world/ -->
---
title: "Hello World"
description: "Hello World, I am Amy"
url: "https://cuteios.dev/2023/03/13/hello-world/"
source: "https://cuteios.dev/2023/03/13/hello-world.md"
date: "2023-03-13"
author: "Amy"
site: "Amy is a cute iOS Developer"
language: "en"
license: "CC BY 4.0 (prose), MIT (code samples)"
---
# Hello World
Welcome to my part of the Internet. My name is Amy and I'm a macOS and iOS developer.